3D Printing

PIRX one – 3D Printer with Self Levelling Print Platform

Ed: In my experience keeping the print bed level on a 3D printer is one of the biggest pain in the butt as well as being one of the most frequent causes of print failures even on $5k models like Makerbox 2X.

Self Levelling print platforms should be standard on all 3D printers, about time they went mainstream, well done guys.

Startup Name *

PIRX one

What problem are you solving? The big problem of all FDM printer is a crooked bed, which results in bad printouts. PIRX one solves this problem thanks to the features in which it’s equipped. Getting rid of this problem makes 3d printing much easier and user-friendly.
What is your solution? We equipped PIRX one in Q-sensors that measure the bed position in three different spots. The printer receives a complete information about the actual bed position. When PIRX one receives information that the bed is not in its proper position, it can automatically compensate the lack in calibration and start printing despite the fact that the bed is crooked.
Why is this a great opportunity? Firstly it makes 3d printing much easier and quicker, but it’s only one amongst the many PIRX one’s features.
PIRX one is a P&P machine that suits perfectly the beginner’s expectations since it doesn’t require any previous experience in the field of 3d printing. PIRX one enables the use of a wide variety of materials. Thanks to the layer height between 0.05–0.03 mm, PIRX one is a guarantee of a great printout. Printer doesn’t need a computer connection as it has a built-in LCD screen and a SD card slot. Another thing worth noting is the modern design that makes PIRX one a unique device among other 3d printers.
Target Market Regarding all of its features, PIRX one becomes a great choice whether you’re a layman or a geek. We want to deliver a printer which is affordable, but also guarantees perfect, precise printouts and contains awesome features. And because of that PIRX one is a great choice for people who are new to 3d printing, and for those who are experienced with 3d printing.
How will you make money? PIRX one is available for purchase through the company’s main website as well as from resellers. PIRX 3D offers worldwide shipping and a variety of delivery options.
Founders Names Jan Fuerst, Łukasz Jakubowski, Piotr Lipert, Krzysztof Stanik
Website http://www.pirx3d.com
What type of funding has the company received Bootstrapped/self funded


Prototyping Hardware – 15 Lessons Learnt the Hard Way

I started writing this article 6 months ago, but such is the nature of hardware, you think its going to be a 3 month project but it turns into 12. I am not an electrical engineer by trade, although I spent the first part of my working life working on aircraft and components so I am used to building things.


A man who carries a cat by the tail learns something he can learn in no other way.

Mark Twain

This quote always makes me laugh, just in case you don’t get the idea, essentially it means you sometimes have to do things and make your own mistakes, people can tell you what will happen but until you screw it up yourself and learned your own lessons you really don’t understand.

And so it is with prototyping hardware.

Cartesian Printed Circuit

Cartesian Printed Circuit

Over the last 6 12 months I have been prototyping a health sensor, packaged as a wearable smart device. The device essentially acts as a dashboard for your body measuring a number of vital signs. I would love to include photos but this is still under wraps.

To pull this project together we engaged a hardware mechatronics engineer who was responsible for prototyping the circuits that would form the basis of the device and a software engineer to build a mobile app as well as an industrial designer to help build a casing that would allow it to be tested and look cool at the same time. Recently we added a bunch of microcontroller firmware programmers.

When you are building an invention that has never been made before there is a lot of trial and error to get something that works correctly, is reliable and robust enough to work in the real world.

One of the requirements of patenting an invention is the provision of enablement, that is all the instructions needed to build the invention, however

there is a world of difference between a working invention on a test bench and a product that works properly on a human with a competitive feature set in an attractive design and form factor.

Humans are rather inconvenient. Very few people are exactly the same size, height, weight, body type or age. The diversity is amazing.

The concept and the science was solid, however it had never been built before, no one had ever worked out what circuit would be needed to drive the invention or a bill of materials or the life support system needed to make it operate such as battery, charging circuit, screen and voltage regulators.

Nor was there any pre-built micro-controller packages (ie power, memory, charging, Accelerometer, GPS etc) small enough to fit the form factor.

We had our opinions but we had to experiment with different sizes to find out if it could be built at a size that made it suitable for a smart watch or wearable device.

10 years ago the circuitry and processing power needed to run this would have required a backpack to transport the computer and battery pack, now it was being shoehorned into a 25mm square PCB.

While we did a lot of things right and the consensus is we made a lot of progress in a very short time, we did learn a lot of lessons the hard way so I decided to share these in the hope you don’t have to repeat them.

Teamwork, continuous integration and change control

Hardware is hard for a bunch of reasons but one of the key reasons is its not just hardware that has to work. Most hardware projects comprise hardware, device software, mobile app and cloud app. Most Web or App start-ups are only trying to build one or two of these.

It gets harder when you have a number of people all working around a very small device who need to co-ordinate tasks across physical, electrical, mechanical and three different software stacksto produce a result and their work has to dovetail with the others to deliver a working product whilst every aspect of the design is in a state of flux.

One of the mistakes I made was not forcing the hardware and firmware engineers, the mobile app developer and the industrial designer to sit alongside each other and look each other in the eye all day every day.

Its very tempting for each discipline to meet, agree some concepts and action items then separate and do their own work and come back to the group with a nearly completed result.

The trouble with this is that new hardware prototyping projects are in a constant state of flux and improvement and so without the the whole team involved in every change, you will find they produce things that don’t fit because the board is no longer the same size or has new components.

Or in the case of software, one of the teams will develop a functionality, that needs to connect to both the Mobile App and the Cloud Web Service, or worse will make a breaking change.

Unless they are working closely, daily and tracking their dependancies it will all go to shit very quickly or you will think something is done but it is only done on one part of the system.

Worse the person responsible might give the impression that the feature works (which in my eyes unless explicitly qualified means it that works for the user) but in fact their small part of the system works.

There may be other pipes to connect or major work required to complete the other aspects and unless the Feature was being tracked on both device, mobile app and cloud there is every chance you won’t find out about this missing part until it becomes critical.

Obviously this is more critical as the device gets smaller, but the same general principles apply regardless of size, arguably they are more important as the complexity of the project increases and the size of the device decreases.

Update: We have recently implemented Slack App with integrations to Trello for task management and Github for Software Version Control this is giving us fantastic results in closing the loop on problems and driving faster development.

Slack-Chat

Trello

Trello

Version Control

Its tempting to think because its a tiny little microcontroller that disciplined version control is not required.

Nothing could be further from the truth.

Generally speaking in hardware prototyping Microcontroller programming is a solitary job. Most of you will be working on something on your own or might have a small team and you have divvied up firmware and hardware.

There is a temptation to not bother with strict version control discipline.

Even if you only have one person involved in the firmware development you must implement good version control routines.

Without good version control bedlam will reign on the prototyping bench.

Whilst excellent technical solutions exist to version control in teams it is a largely human problem.

Github


Most of our team members had run their own projects or done solo projects for others but had not had to work in a larger development team.

Trying to get a bunch of disparate software, hardware, firmware and mobile developers to jointly use Github.com as part of their daily workflow was somewhat challenging.

Anyone is welcome to comment on how screwed up my Github philosophy is, I am just describing how we created some semblance of order from chaos, undoubtedly there is a much better way to do it.

Here are some of the resources we used around how to setup a Github workflow

https://coderwall.com/p/wxowig

http://blog.codinghorror.com/check-in-early-check-in-often/

http://sethrobertson.github.io/GitBestPractices/

http://www.databasically.com/2011/03/14/git-commit-early-commit-often/

http://www.git-tower.com/learn/ebook/command-line/appendix/best-practices

http://nvie.com/posts/a-successful-git-branching-model/

https://github.com/janosgyerik/git-workflows-book/blob/small-team-workflow/chapter05.md

http://www.mentalbrew.com/blog/2011/10/11/a-simple-git-workflow/

Our Github Guidelines

  • Commit Early Commit often + Use Branching
  • We will have a master + branches.
  • We will have a Master which can be deployed at any time
  • New Feature=New Branch
  • We will commit frequently to our branches (at minimum daily but more often if a small part of the code works)
  • We will do good comprehensive commenting in both the commits and also the code.
  • The whole feature does not need to be working but each feature should be broken down into small subsets and at least one of these should be working when committed (and the commit comment should describe what is and isn’t working)
  • As a programmer believes their feature is working they should apply to have this merged with the master.
  • Merges should happen very regularly
  • One of the other team members will review and merge

Also you might have this working nicely but again because its a human problem it can all fall into a pile of shit in a short period of time without constant discipline.

Testing beats Beauty

Its easy to test software as you go, invariably when building experimental hardware inventions you have to build significant parts of the device before you can start to test key functionality of hardware especially when its experimental.

Form follows Function.

Ferdinand Porsche

Yes you can use a breadboard and initially you probably should however this is not useful in a wearable sensor build as breadboards are not particularly wearable nor are the circuits robust.

Also increasingly many new components are not available in through hole mounting so you need to work out how to do surface mount anyway.

Whilst product beauty is essential for success in the market and for raising funding , in my opinion there is very little point designing beautiful casings or industrial design when you are still prototyping the circuits and sensors and their functionality is not well understood yet, depending on the hardware type it is possible your design will have to change dramatically to give the functionality you need.

Our key sensor needed to be consistently close to the skin, the original industrial design was beautiful but physically it could not keep the watch in contact with the skin consistently nor was the material rigid enough to make it robust.

Subsequent designs overlooked key physical constraints of operating on a moving human.

We should have started serious testing of the key inventive aspect a lot sooner and would have saved a lot of time and effort on design and circuit fabrication that ended up being superseded when more rigorous testing uncovered new learning.

The importance of early and constant hardware testing cannot be understated

Its tempting to try to get a nice looking product together before you start rigorous testing, but a more efficient approach is lots of individual circuit and sensor testing especially testing known working or reference designs vs unknown circuits before assembling them all and testing together.

To be fair we did a lot of electronics testing during the whole process, but in hindsight I would have spent a lot more time a lot earlier on testing the implementation on a number of different humans and body parts.

Getting a device working reliably on a human is very different to getting it working on a test bench.

Warning Industrial Designers don’t have to build what they design (and they know it).

I am not singling Industrial Designers out, each of the disciplines has their own idiosyncrasies, however you as the project manager need to understand they are not designing with manufacturing in mind.

They are focused on beauty and cool, not on whether it can be built or if suitable components are available.

This is where it can get potentially expensive very quickly. Remember you are not Apple. A recent article by Bolt.io the hardware incubator from Boston details the lengths Apple goes to in their pursuit of perfection.

My favourite is that when they decided to make 1 million Macbooks Apple purchased 10,000 CNC Mills to make the aluminium bodies.

The lonely prototyper can’t afford to make a new alloy or touch screen glass to achieve some amazing experience.

Largely what you build must use existing technologies, materials and manufacturing processes. Very few prototypers have the budget to develop completely new technologies or materials.

However Industrial Designers do work with the full knowledge that they don’t actually have to manufacture their designs themselves or fix the inevitable materials problems or deal with the electronics issues of is there large enough space for a battery or even if such a small battery exists.

The onus is not on them to ensure their design is going to be manufacturable from an electrical, materials and mechanical perspective.

This problem belongs to the Mechanical and Electrical Engineers, who is often not from the same firm.

Yes thats right you will need to engage a separate group Mechanical Engineering to actually mechanically implement what the industrial designers design in the appropriate materials and the three groups EE, ID & ME will go back and forth with each other negotiating about how the thing of beauty will turn into a real physical device that can be manufactured that actually will still work electronically and fit within cost constraints.

It came as somewhat of a surprise to me that none of the aforementioned is their problem, they expect that the mechanical engineers will take care of all of these issues.

Of course they are not deliberately inconsiderate, but I have seen well known and successful designers, design beautiful product which is almost un-manufacturable.

Remember, they are the your advisor not the client.

They will want to do very cool things and you should co-operate wherever possible because this is what you are paying them for, however at some point you are going to have to pull them up when they start designing problems into the product.

Seriously this is how it operates.

You have been warned.

Be prepared to throw your prototype away and start again.

You start the design process with some assumptions about mostly unknowable things. You can spend weeks or months researching, but in the case where you are building a new invention you really need to grab the PCB and Etchant and build a board and test it.

Unfortunately sometimes you are going to get it very wrong, even if you have spent a stack of cash, you have to consider killing the prototype and starting afresh.

We found that once we got to a meaningful level of testing on an actual human there was no way our original design (based on flexible circuit board and silicon bands) was going to survive contact with the customer.

We abandoned both physical design and electrical layout and moved from Flexible to super thin PCB (the logical circuit design and components were ok, but we had to start from scratch on the circuit layout) and squeezed the designs into two 25mm square boards (for reference purposes the smallest commercially available arduino board is about 40mmx40mm and multilayer)

This was a very hard decision, we had spent 8 weeks and a lot of money on this, but the decision turned out to be the right one, we managed to get the redesign done in 4 days and the device working reliably in under a week.

So be prepared to throw your latest revision out and start again again.

Prototyping & Physical Design

Buy a decent 3d printer <100 micron resolution preferably 50 micron that can print numerous material types, including flexible materials or just resign yourself to find an Objet at a service bureau somewhere and pay $100-200 per print.

We ended up with a Makerbot Replicator 2X (this is the experimental one) I can recommend it, not as accurate as an objet (almost nothing is) but can print numerous different materials, including flexible, wood like material, fluro and conductive ABS and is about 1/10th the price and costs much less to run. Update: We have had a lot of trouble keeping this running smoothly, prints seem to screw up regularly.

Makerbot2X

We screwed around for a few months designing a fantastic looking watch band and casing and then getting 20 of them built overseas only to find that a, this was never going to be manufacturable and b. it wasn’t at all robust and didn’t allow the sensors sufficient contact, in fact the band material was very soft and didn’t have sufficient stiffness to hold the electronics properly and many aspects didn’t fit correctly despite what looked like a very good design and CAD work and numerous man hours spent between the electrical engineer and the industrial designer (more about that in a minute).

When we started using an Objet 3D printer at a local bureau we very quickly iterated and made numerous major physical design changes in the space of a few weeks and now we have a robust device that looks and feels like a good candidate for field testing but if we had of continued on the previous path we probably would have still been stuck.

While we have salvaged some of the designs there was a month of wasted time in trying to get a physical design to work that was fundamentally flawed.

A week with a 3D printer would have identified this problem must sooner and with a few iterations would have resolved it quickly.

Components, Fabrication & Assembly Leads & Lags

Another reason hardware is hard is that there are long leads and lags in the design and fabrication process.

Every time you have to resign a circuit, its another 7-45 days to redesign, order parts from overseas, etc etch new PCBs and then solder them together and test or have them assembled on an SMD machine.

In software you can change, deploy and test numerous times a day and many companies do this on a continuous deployment basis.

Not so with hardware.

There are a few ways you can mitigate this.

Move to Shenzhen

This is a new title, I only added it this morning after visiting Shenzhen last month. Shenzhen is the hardware capital of the world, prototypes can happen a lot faster here than in other parts of the world.

Shenzhen New - Credit: Yuan2003

Shenzhen New – Credit: Yuan2003

Be warned its not all smooth sailing, you should be concerned about cultural and communication issues, about theft of your design by suppliers, vendors who are not certified (RoHS, CE etc) being given crap product or not what you agreed.

However after you see the ready availability of mechanical and electrical components in their wholesale trading markets you will understand how this can speed up the prototyping process, we have written a few stories about our visits to Shenzhen here.

So I advise you to get on a plane and spend a month there, I believe it will save you 3-6 months time in the Western world.

Important note concerning buying electronics components in China. You need to be clear what you are buying, processors or genuine brand name items may be counterfeit or recycled. There might be questions over their certifications or compliance. Caveat Emptor.

Ordering Components & Idle Time

Order more components than you need and ship them express. Changing your layout for your Website or App is reasonably trivial and mostly can be done with minor code changes, rarely a complete rewrite.

With hardware you may be discarding your components and logical design and completely rebuilding boards.

When you change your hardware design frequently as you learn and improve your implementation it might seem you are burning through components and wasting money, but this pales in comparison to the opportunity cost of having your engineers idle if you have to wait for overseas component shipments.

We had a few weeks of very slow progress waiting for equipment to arrive that might have been improved with earlier ordering and ordering more than the design called for.

Its tempting to think this is wasteful(I am a tight arse and it grates on me), but in my experience we might be talking about $100-200 in parts but a wasted day for an engineer costs -/+$500 and it’s easy to lose 4-5 days when waiting for overseas shipments.

Inevitably you will also break or waste components, if you have ever had to go searching for a 0201 resistor (smaller than I can see with my glasses), that has jumped out of your tweezers you will understand.

You need to provision for wastage.

The lesson here is order as early as you can, pay the extra $50 for express shipment and order 2-3 times as many as you think you will need, arguably buying a huge starter pack of standard and SMD components is a good investment as well.

Alternative Suppliers & Components

There may be alternative suitable components that suit your design and other suppliers who can supply it both locally and from overseas, sometimes an alternative might require an alternative board designs (this could be an issue with FDA approved devices) but if you actually manage to hit the big time and the orders are flowing and you can’t get the original components moving to an alternative design is better than not being able to supply.

These are the most popular, some have Asia Pacific Offices as well as US

  • Avnet
  • RSOnline
  • Element14
  • Digikey

You should assess if the components are going to be able to be supplied with consistency. We have noticed in some cases large companies who have fantastic looking processors but they are very difficult to get samples for testing. They often don’t deal directly with the normal components supply chain (Mouser, Digikey, Element14, RSOnline, Avnet) and want to know your forecasts and when you want them before they will provide. (It took me more than 2 months to get a datasheet off one of the big guys and I work for a $6 billion investment fund, 8 months later I still don’t have a sample)

One of the best sites to plug your Bill of Materials into is Octopart.com you can detail all the parts you need and they will display a list of each distributor who holds that part and more importantly will give you the ability to predict costs at volume but allowing you to find alternative suppliers and work out price breaks.


Octopart.com

Octopart.com

PCB – Make your own or outsource?

Australia like many non manufacturing countries doesn’t have much of a PCB/Electronics manufacturing industry so you can’t just duck down the road and get an updated PCB design fabricated as most of the work is sent offshore.

Initially we started off with basic single layer boards which is easy and fast, later we were building two layer Flexible film circuits using a flexible kapstan copper film and we couldn’t even locate the material locally, it had to be shipped in from overseas.

All the companies who claimed to be able to do this were shipping the work to China with a 2-3 week turn-around time. We couldn’t afford that downtime so initially we decided to make them locally by hand.

PCB Tutorial - Intructables.com

PCB Tutorial – Intructables.com

There are a stack of good tutorials on how to do this on Instructables.com but if you want to save time, go straight for the 600dpi laser printing in conjunction with glossy paper and an Iron, having tried a Sandwich press, a laminator and various transfer materials this is what worked best for us.

Making our own was the right decision initially, it gave us a lot of flexibility and we could turn them round in a few hours but what we found though as our circuits got more complex and much smaller, hand fabrication was not very efficient especially the toner transfer aspect was difficult to get right on the very fine traces and we would end up having to to do minor reworks on every board we made.

As our requirements called for smaller designs with higher density and the functionality of the designs was proved it made sense to move to multilevel boards and send this to a prototyping company with the correct equipment.

The lesson is that initially speed and iteration is more important than precision and complexity but as your prototype progresses closer to production complexity increases, you need to go multilayer and speed slows.

Update: Found some locally who can turn these round in 7 days.


Surface Mount Designs.

We had to breadboard circuits initially, however as many of the sub component designs were available as reference designs from the chip manufacturer, which means you waste a stack of time testing buying through hole components and breadboarding what is a known design and then you have to build a surface mounted version

In hindsight now we are far more comfortable with the process I would suggest that you start with SMD components wherever possible.

Hand soldering SMD components is fiddly and can lead to suboptimal results however most of you probably think its not possible to do SMD without a specialised oven. (they are actually pretty cheap approx $250 SMD Oven on Ebay)

Soldering one of the worlds smallest component 2mmx2mm

Soldering one of the worlds smallest component 2mmx2mm

Well you have to ask yourself what would MacGyver do?

You might be thinking you can’t solder SMD on your bench at home, well here is a trick that has worked very well for us. Its a $20 sandwich toaster and a temperature probe from a $15 Multimeter. Check the SMD soldering requirements for your paste, run the sandwich toaster up to temperature (they normally cook above the required solder temperature) and then check the temperature output on the Multimeter (or you can actually see the solder melt on some of the more obvious components, you can watch it as it happens across the board almost simultaneously).

WARNING: Clearly you cant reuse the sandwich toaster for food, just buy one for this job, they are cheap. Also you can get soldering stations for <$200 which have a reflow hot air gun which might work for some designs.

Reflow SMD soldering saves hours of very difficult hand soldering and is produces a far better result than you can manage with a solding iron.

New high tech PCB Prototyping equipment


Originally we did everything on a breadboard using through-mount components

Through Mounted Components

as this was the commonly accepted way of doing things, but it presents a problem.

You need to use normal components through mounting but none of the cool new chips you will want use is going to be through mount, no one makes devices like this anymore, so you will be using SMD components sooner than later.

SMD Components

SMD Components

In hindsight and going forward we will start all new designs with SMD components.

SMD components are so small that if you start to get to any level of complexity you will need to get a PCBA Assembly provider or your own pick and place machine (I think if you are doing any more than 5 assembled boards a year with anymore than 20 per run this will probably pay for itself very quickly in saved time and heartache)

Resistors on Match Head - http://www.indium.com/

Resistors on Match Head – http://www.indium.com/

Getting to Production.

We are almost at the point were we are trying to build boards that are production ready.

Different fabrication companies have different design rules about what you can make in their plant and how boards have to be laid out in order to manufacture them.

Most companies have design guides but these are usually only given out once you have established contact or a relationship with them.

Here are a few PCB design resources I found

http://www.youtube.com/watch?v=VXE_dh38HjU

http://www.youtube.com/watch?v=Uemr8xaxcw0&feature=share&list=PL3C5D963B695411B6&index=23

Each company will be different so check the design you want to build can be built by your supplier.

The biggest issue is around size of components. If you are designing with 0201 size some assemblers may not be able to handle them, just depends on their machines.

Also there are a few players trying to disrupt the electronics prototype and production process by helping you to design your PCB and then either providing prototype boards or in the case of Circuithub.com turning it into a production version with enough volume to satisfy most new product launches and Kickstarter projects.

Seeed Studio - Propagate

Seeed Studio – Propagate

If you don’t have all the equipment don’t let this get in the way have a look at

Be unreasonable and always question objections

When one of your team or an interested party tells you something can’t be done you must question it, in my experience its usually the start of a great step forward or an insight.

By insisting on people finding a way to do things they believe are impossible you almost always take steps forward. Sometimes big steps. Sometimes you end up with egg on your face as well but thats ok.

You don’t have to know how to do ir, you just have to know it can be done.

When engineers told me they couldn’t squeeze anymore chips onto the admittedly tiny motherboard for the smart watch, I asked them to look at the Apple 5S teardown photo below.

Its challenging however there is hardly a wasted space on these boards, the designers are elegant in their space efficiency.

Its easy to say well they are Apple you expect this, my answer is me too :).

iphone-5-logic-board-front-and-back Credit - http://www.extremetech.com/

iphone-5-logic-board-front-and-back Credit – http://www.extremetech.com/


Tools & Equipment

You either find a great Hackerspace (worldwide list of hackerspaces) that has all the equipment or you are going to buy this within the next few months, better to flex the plastic and get it done.

  • Computer Controlled Soldering Station with Hot Air Gun (dont just buy the basic one, you will end up buying the good one later) $100-200
  • 3d Printer – Something that can do more than PLA, ie ABS, Flexible, different textures etc and preferably two heads (Makerbot 2X or Hyrel both good but expensive) $2000-5000
  • 6 pack of pliers of various shapes and sizes $20
  • Component Drawers to keep all your tiny bits $10
  • Magnifying Glass with LED lighting ring $50
  • 200x Magnifying glass with USB connection to your PC $100
  • Dremel with stand and all the attachments. $150
  • Reflow Oven or Rework Station $250
  • Wire Strippers $10
  • Mini Vice, 3rd hand/Jewellers Vice $20
  • Soldering Station Exhaust Fan with filter $50
  • Safety kit, masks, eyes, ears, skin $100
  • Multimeter $20
  • Signal Analyser (might be better to rent)
  • Development Kits for the Microcontroller you are working with $100-300

Wish List

  • Pick and Place Machine $5000-7000 (make sure they can do the component size you need) I know this is a lot of money however if you can turn around prototypes in 2-4 days not 2-4 weeks you will pay this back extremely quickly and there is a major opportunity cost to slow prototyping.
  • Circuit Board Printer like the Cartesian ArgentumCartesian Argentum $2000-2500

Move Fast and Make Things

Instead of theorizing and pontificating about if a certain design will work better or solve a problem get cracking and make it, nothing solves an argument like a working device or not.


What are you working on?

Our readers love to hear about new hardware startups and hobbyist projects.

Leave me a message in the attached form about your product and I will write up a story about it

[contact-form subject=’Startup88 – Feedback Form What are you working on?’][contact-field label=’Name’ type=’name’ required=’1’/][contact-field label=’Email’ type=’email’ required=’1’/][contact-field label=’Website’ type=’url’/][contact-field label=’What are you working on?’ type=’textarea’ required=’1’/][/contact-form]


MetalTree’s HUGE 3D Printer demos at Sydney Maker Faire

Meet the Metaltree 3D Printer maker Jason Crowe.

Metaltree-Jason Crowe

Metaltree-Jason Crowe

At 1.2m high this is the biggest 3D printer I have seen (and none of it is support cabinet), earlier in the year we researched over 50 printers in our 3d printers comparison and this is significantly larger build volume than anything I have seen on the market short of the industrial versions.

It uses a Delta configuration which means that the extruder head moves around on 6 arms and the build plate doesn’t move at all.

This simplifies construction and allows for a larger build space for a given size and weight than a traditional 3d Printer where the extruders move X Y but the build plate moves up and down as the item is printed.

Metaltree Extruder Head

Metaltree Extruder Head

This is still a prototype so its not ready for production yet, Jason is working towards getting it production ready and plans to launch a crowdfunding campaign to sell them next year.


Ownphones – Custom printed Bluetooth Earphones

ownphones

ownphones


Startup Name * OwnPhones
What problem are you solving? OwnPhones (#ownphones) today went LIVE with a Kickstarter (#kickstarter) campaign (http://bit.ly/ownphones) to help complete the development of its revolutionary product – the world’s first wireless 3D printed, personalized smart earbuds (#earbuds) and an accompanying mobile app for iOS (Android to follow).The campaign, which has a funding goal of $250,000USD, features limited Early Bird specials of 50% off all sets of earbuds (regular retail prices range from $299USD to $449USD).Designed to fit perfectly and built exclusively for each individual ear, OwnPhones earbuds represent a combination of the very latest in 3D printing, Bluetooth technology and personal audio.Along with being custom 3D printed according to the user’s personality and choice of activities, they’re also completely wireless, cancel noise around the user and can even be made to fit their lifestyle with an ergonomic custom fit. And with thousands of combinations of features and four different models (“Fit,” “Designer Fit,” “Smart Fit” and “Jewelry Collection) to choose from, OwnPhones earbuds can be personalized for each user.
What is your solution? “Ears are like fingerprints – each one is unique, so it is time that consumers were able to get earbuds that actually fit their ears properly,”OwnPhones Personalization Technology• A Custom Fit The OwnPhones mobile app turns a phone’s camera into a 3D scanner. By following a few simple steps, users create a short video orbiting the phone around their ears. The OwnPhones servers will then convert the video into a 3D model of their ears. This creates a custom ergonomic fit so every time the user wears them, they’ll fit perfectly and won’t jiggle when they run or jostle when they dance!• 3D Printed Each pair of OwnPhones earbuds offers a precise fit down to the millimeter. The printer can assemble 3D objects out of many different materials. This allows OwnPhones to match the cartilage in the user’s ear and can build any set of OwnPhones earbuds, one-at-a-time.• True-Wireless The earbuds are integrated with Bluetooth 4.0 technology, so there’s no cord to get tangled and no plugs to fumble with. OwnPhones gives users the freedom they need without the restrictions of a cord and will be the world’s first 3D printed wireless earbuds.• SoundScaping Since OwnPhones are perfectly fitted to each ear, they can be used to block out noise. But not all noises. A built-in digital signal processor can filter ambient noises (Soundscaping) and the user can use the OwnPhones mobile app to let through requested sounds – from a beeping alarm to a friend’s voice (OwnPhones calls this “Real World Notifications”).• Own Status Using red, yellow and green LED lights, the OwnStatus feature can let OwnPhones communicate for the user. A red light tells people, “Leave me alone,” a yellow light says “I’m busy” and a green light says “Let’s chat.”• Versatile Advantage Since users have two separate earbuds, they can push music to one side and let the world in through the other. Now, there’s no need to buy another headset to make and receive calls in the car… users can use their OwnPhones both as earbuds and as a headset.YouTube Video: http://youtu.be/Wv05p-ueHEI
Why is this a great opportunity? Kickstarter Details and Availability OwnPhone’s Kickstarter offering is now available at: http://bit.ly/ownphones. OwnPhones is seeking support to complete the development of its revolutionary wireless 3D printed, personalized smart earbuds and an accompanying mobile app for iOS (Android to follow). Early Bird Specials include: for a $149USD pledge, users can get the “OwnPhones Fit” model. For a $175USD pledge, users can get the “OwnPhones Designer Fit” model.For a $199USD pledge, users can get the “OwnPhones Smart Fit” model.Additional rewards include: for a $799USD pledge, users can design (in their own brand look and style) their own custom branded earbuds. As part of this reward, contributors can sell their branded earbuds on the OwnPhones online store. Another rewards option includes a pledge for $9,999USD, which will see OwnPhones commissioning a local artist who will meet with the contributor to custom design a Gold & Diamond studded fashion earbud.
Target Market Anyone who uses earbuds
How will you make money? Via sales of the earbuds
Founders Names Itamar Jobani
Website http://www.ownphones.com
What type of funding has the company received Bootstrapped/self funded


Startup88 Verdict

A few days ago I reviewed the NORMAL 3D Printed Custom Earphones, which look great. Ownphones pitch and presentation isnt quite a smooth or polished as the Normal, however they seem to have put the effort into the product rather than the marketing. The key difference here is the Ownphones are bluetooth where are the Normal earphones have wires. In addition the Ownphones have created a whole range of style options where your earphones can be completely customised including probably the first set of hea act as jewelry. As at 20th July they have 536 backers and $106,000 towards their $250,000 goal with 35 days to go. Looks like they have a shot of making their goal. There is probably enough space for a bunch of custom earphone makers, certainly given the size of the existing market and how much that has grown in the last and the propensity to pay $100-300 for their earphones so they probably have a good chance of making it but I am expecting a rush of custom built products of all types over the coming months and after the first 5-10 it will start to get repetitive. What’s not clear to me is how any of these customised hardware businesses will scale when they have to produce 1000s of devices a month, its tough to build little bits of hardware, little bits of custom hardware sounds diabolical.

Ownphones Status

Ownphones Status

Ownphones Soundscaping

Ownphones Soundscaping

Ownphones Custom Fit

Ownphones Custom Fit

NORMAL – 3D Printed Custom Earphones

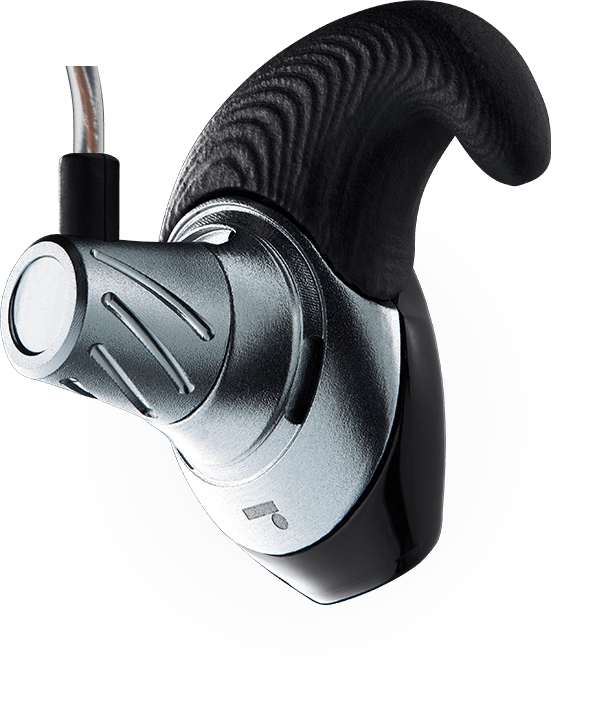
These are cool, custom made 3D printed earphones for similar (albeit expensive) pricing to premium ear buds.

http://youtu.be/8tmhdOfIEqU

Normal-Ear-Bud-ExplodedNORMAL uses an App that takes photos to determine the size and shape of your ear and then prints an ear bud that will fit you like a glove.

Normal-Custom-Ear-Buds-App


NORMAL is opening a factory in Manhattan where you will be able to view your earphones being made. They are setting up 3D printers, CNC machines and assembly lines to produce them on the spot.

Normal-FactoryBe interesting to see how they scale, I imagine it would difficult to trust this to overseas 3rd party manufacturing when each is built for a particular customer and delivery time is expected in days not months.

For years we have been talking about mass customisation and have seen both vehicle and clothing manufacturers offer mass customisation but it will be interesting to see if this is new trend starting for mass customisation of personal electronics.

Want to learn something? Make something cool – UNSW CREATE club prototypes a Quadcopter from scratch

Create-logoUniversity of NSW has a cool student group called CREATE, in their own time they teach each other how to design, fabricate and build hardware and have their own Hackerspace on the University campus.

I spend a lot of time around the Universities and they are one of the most entrepreneurial and creative groups I have met. They run weekly courses on Solidworks, Arduino, electronics, soldering, design, PCB prototyping and have access to workshops and 3d printing and other equipment to make their creations. They also setup market stalls in the University every week to sell electronics parts to help fund their activities and make it cheaper for the participants to get involved. If you are looking for startup team members I would suggest spending some time around these guys and girls, they get up and make things happen.

In 2013 they designed, built and sold a quadcopter from scratch, here is their story.

Creating a Quadcopter from Scratch

Quadcopter Chassis-Create UNSW

Quadcopter Chassis-Create UNSW

Throughout the semester, CREATE has been working on a DIY 3D printable Quadcopter, designed totally in house. What began with just a simple centrepiece, used to hold two cheap cuts of 12mm aluminium tube from Bunnings, has quickly developed into a totally enclosed, stable, quadcopter build.

The original design was based off parts we inherited on loan, which proved to be a good way to get in the air, yet for the quad to be successful, we needed to choose and buy parts specific to our needs.

Component list:

Main Chassis

The current quadcopter model still has the original 12mm diameter aluminium tube, though the centre chassis and motor mounts have evolved through a number of design revisions. The current chassis features 4 separate arms, each 250mm in length, and a hole in the centre which allows all the motor cables to fit through the centre.

Underneath the hole, there is a slot to hold the 4 in 1 esc, a mobile phone for telemetry and video, and a set of rails allowing us to slide on a custom battery clip, or anything else we need to carry. An ideal build would feature 12mm carbon fibre tube, as it has superior strength, weight and vibration dampening characteristics.

One of the original Prototypes - Credit - Sam Cassisi

One of the original Prototypes – Credit – Sam Cassisi

Flight Board Dampening System

Quadcopter FlightBoard

Quadcopter FlightBoard

A key feature of the new design is its flightboard vibration dampening system. The system is based on an elastic band, which holds the flight board down, and a set of foam pads, which dampen. The result of this is very little vibrations being passed to the flight board, providing a stable flight.

Protective Hood + GoPro Mount

In the pursuit of neatness and integration, we added a hinged hood which both covers all the electronics, and provides a high mounting point for the GPS receiver. Furthermore, the hood is extends vertically above the height of the propellers, so in the event of the quad flipping and landing upside down, the re-printable plastic will take the brunt of the damage.

The front of the chassis features a GoPro mount designed into the printed plastic, allowing secure camera mounting.

Quadcopter-Hood

Quadcopter Hood


Quad Cover Render - Credit Thingiverse.com

Quad Cover Render – Credit Thingiverse.com

Landing Gear

The landing gear is designed to transfer the landing force into the arms of the quad, taking stress away from the plastic. Furthermore, the whole setup is extremely light, using only 2 tiny cable ties to lock the landing gear onto the arms. A flange on either side of the landing gear meshes around the chassis and prevents the landing gear rotating unfavourably. The modular design allows us to make the legs longer if larger payloads are required, and to weld/reprint pieces as they break, rather than the quad.

Quadcopter-Landing Gear

Quadcopter-Landing Gear


Landing Gear - Renders

Landing Gear – Renders

Landing Gear Renders - Credit Thingiverse.com

Landing Gear Renders – Credit Thingiverse.com

Motor Mounts

The motor mounts have matured significantly since the first revision, as the current mounts are strong enough to resist minor crashes, but will break in the event of a serious accident, saving more expensive components like motors. A single nut and bolt secure the motor mount on the end of the aluminium arms.

The mounts feature a hidden cavity designed to hold a LED diode perfectly, the idea being to light up the front motor mounts with green LEDs, and the rear with red LEDs. There is also a slot to allow the motor wires coming from the ESCs to be fed through.

Quadcopter-Motor

Quadcopter Motor


Motor Mount Renders

Motor Mount Renders – Credit thingiverse.com

Want to build one?

The CREATE group have kindly uploaded all the files and designs to a Thingiverse page available here http://www.thingiverse.com/thing:172068 and licensed it under Creative Commons – Attribution – Share Alike License.


Technical Details:

Multiwii pro 2.0 flight board, running Megapirate 3.0.1 R2, a exact port of Arducopter

U-Blox Neo-6M GPS receiver, 10Hz

Turnigy 9x 8ch transmitter and receiver, running custom er9x firmware

Custom 4 in 1 120A ESC (4x30A)

AX-2810q 750KV motors, running at 3S (~12V), max current draw of ~26Amps

11×4.7 carbon plastic composite propellers

Approx. 1.5kg thrust per rotor at full throttle

3DR 915Mhz telemetry radios for 1.6km radius connection to PC software (Mission Planner)

Bluetooth for smartphone compatibility.

2x2200mAh Turnigy 3S 20-30C lithium polymer batteries, parallel.

Photos from the CREATE Quadcopter for the end of year social

Photos from the CREATE Quadcopter for the end of year social


Enhanced by Zemanta

3D Printer Comparison Guide – 50+ Printers featured inc Resolution, Print Volume, Costs & Materials

Recently I had to do some research on 3D Printers for work to try to get one that would print in a number of different materials but could not find a comprehensive list of 3D printers.

So I asked our team to spend a few weeks researching to find and compare every 3D printer they could find. Here is our comprehensive guide to all the 3D printers available in early 2014.

If you are launching a new 3D printer or if we missed your Printer our apologies please Tweet me @mikenicholls88 or tell us your story here and we will add it to the list, if it looks interesting we will also publish a separate article on it.

Also if there are any materials to be added, errors to be corrected or prices have changed please let us know and we will update immediately.

Unless otherwise specified all costs are in $USD

B9 Creator

Resolution: (X,Y) Plane: 50 microns, Z Axis: 6.35 microns

Materials to Print: UV-Cured Resin

Cost: $3375

Print Volume: 4″×3″×8-1/8″

Website: http://www.b9creator.com

Twitter Handle: https://twitter.com/B9Creations

Link to Reviews: makezine.com/review/guide-to-3d-printing-2014/b9-creator/

http://revolutionofmaking.blogspot.in/2012/10/review-top-5-low-cost-3d-printer-of-2012.html

Cube 2

Resolution: 200 microns

Materials to Print: No Print materials PLA, ABS

Cost: $1299

Print Volume: 5-1/2″×5-1/2″×5-1/2″

Website: http://www.cubify.com

Twitter Handle: https://twitter.com/cubify

Link to Reviews: http://makezine.com/review/guide-to-3d-printing-2014/cube-2/

http://3dprintx.net/mbot-cube-ii-3d-printer-review/

http://tobuya3dprinter.com/mbot-cube-2-3d-printer-review/

Felix 2.0

3d Printer Felix 2.0

Felix 2.0
shop.felixprinters.com

Resolution: Z axis: 0.05-0.35 mm

Materials to Print: PLA, ABS, nylon

Cost: $1949

Print Volume: 10″×8″×9-1/4″

Website: http://shop.felixprinters.com/

Twitter Handle: https://twitter.com/FELIXprinters

Link to Reviews: http://makezine.com/review/guide-to-3d-printing-2014/felix-2-0/

http://www.3dprintronics.com/blog/61-felix-3d-printer-review

Formlabs Form 1

3d Printer Formlabs Form 1

Formlabs Form 1
www.formlabs.com/

Resolution: Minimum layer thickness (Z axis): 25 microns

Materials to Print: UV-cured resin

Cost: $3299

Print Volume: 4.9″×4.9″×6.5″

Website: http://www.formlabs.com

Twitter Handle: https://twitter.com/formlabs

Link to Reviews: http://makezine.com/review/guide-to-3d-printing-2014/formlabs-form-1/

http://www.wired.com/reviews/2013/09/formlabs-form-1/

http://www.popularmechanics.com/technology/gadgets/reviews/3d-printer-prizefight-makerbot-replicator-2-vs-formlabs-form-1-14731437

http://www.3dengr.com/2013/03/Form1.html

Lulzbot Taz

Lulzbot TAZ 3D Printer

Lulzbot TAZ
www.lulzbot.com

Resolution: Z axis: 75 microns

Materials to Print: ABS, PLA, PVA, HIPS, and Laywood

Cost: $2195

Print Volume: 11.7″×10.8″×9.8″

Website: http://www.lulzbot.com

Twitter Handle: https://twitter.com/lulzbot3D

Link to Reviews: http://makezine.com/review/guide-to-3d-printing-2014/lulzbot-taz/

http://www.gizmag.com/review-lulzbot-taz-3d-printer/29284/

http://3dprintingindustry.com/2013/05/17/taz-lulzbots-newest-3d-printer-is-all-grown-up/

http://www.3dprinter.net/3d-printer-review-lulzbot-taz

Solidoodle 3

Resolution: Z axis: 0.1 mm

Materials to Print: ABS, PLA

Cost: $799

Print Volume: 8″×8″×8″

Website: http://www.solidoodle.com/

Twitter Handle: https://twitter.com/Solidoodle3D

Link to Reviews: http://makezine.com/review/guide-to-3d-printing-2014/more-printers-at-a-glance/

http://www.engadget.com/2012/12/15/solidoodle-3-hands-on/

Mendel Max 2.0

Mendelmax 2.0 3D Printer

Mendelmax 2.0
www.mendelmax.com

Resolution: X &Y Axis: 0.125 mm, Z axis: 0.1-0.4 mm

Materials to Print: ABS, PLA

Cost: $2195

Print Volume: 7.75″ × 12.25″ × 8.75″

Website: http://www.mendelmax.com

Twitter Handle:

Link to Reviews: http://makezine.com/review/guide-to-3d-printing-2014/more-printers-at-a-glance/

http://3dprintingindustry.com/2013/01/08/new-mendelmax-2-0-3d-printer/

MBot Cube 2

MBot Cube 2 3D Printer

MBot Cube 2
www.mbot3d.com

Resolution: Z axis: 0.1mm

Materials to Print: ABS, PLA

Cost: $1399

Print Volume: 10.25″ × 9″ × 7.75″

Website: http://www.mbot3d.com

Twitter Handle: https://twitter.com/mbot3d

Link to Reviews: http://makezine.com/review/guide-to-3d-printing-2014/more-printers-at-a-glance/

http://3dprintingindustry.com/2013/04/18/mbot-cube-3d-printer-just-a-little-bit-naughty/

http://tobuya3dprinter.com/mbot-cube-2-3d-printer-review/

http://3dprinting.teya.ca/2013/02/meet-the-mbot-cube/

Leapfrog Creatr

Leapfron Creatr 3D Printer

Leapfrog Creatr
www.lpfrg.com

Resolution: Z axis: 125 micron

Materials to Print: ABS, PLA and PVA

Cost: $2500

Print Volume: 9″ × 10.5″ × 7.8″

Website: http://lpfrg.com

Twitter Handle: https://twitter.com/Leapfrog_3D

Link to Reviews: http://makezine.com/review/guide-to-3d-printing-2014/more-printers-at-a-glance

http://www.prsnlz.me/blogs/daniel-oconnors-blog/leapfrog-creatr-review-3d-printer-review/

Openbeam Mini Kossel

Openbeam Mini Kossel 3d Printer

Openbeam Mini Kossel
www.makezine.com

Resolution: 100 steps per mm in all three directions

Materials to Print: PLA

Cost: $899

Print Volume: 7″×5.9″ dia

Website: http://www.openbeamusa.com

Twitter Handle: https://twitter.com/openbeam

Link to Reviews: http://makezine.com/review/guide-to-3d-printing-2014/openbeam-mini-kossel

Printrbot Plus

Printrbot Plus 3D Printer

Printrbot Plus
www.makezine.com

Resolution: Z axis: 0.1 mm

Materials to Print: ABS and PLA

Cost: $999

Print Volume: 8″×8″×8″

Website: http://printrbot.com/

Twitter Handle: https://twitter.com/printrbot

Link to Reviews: http://makezine.com/review/guide-to-3d-printing-2014/printrbot-plus

http://3d-printers.toptenreviews.com/printrbot-plus-review.html

http://www.reddit.com/r/printrbot/

http://www.protoparadigm.com/blog/2012/08/printrbot-plus-build-with-timelapse-and-notes/

Printrbot Simple

Printrbot Simple 3D Printer

Printrbot Simple
www.printrbot.com

Resolution: Z axis: 0.1mm

Materials to Print: PLA

Cost: $399

Print Volume: 3.9″×3.9″×3.9″

Website: http://makezine.com/review/guide-to-3d-printing-2014/printrbot-simple

Twitter Handle: https://twitter.com/printrbot

Link to Reviews: http://makezine.com/review/guide-to-3d-printing-2014/printrbot-simple

http://3dprintingindustry.com/2013/10/08/3d-hacker-gives-printrbot-simple-thumbs/

http://arstechnica.com/gadgets/2013/08/home-3d-printers-take-us-on-a-maddening-journey-into-another-dimension/

http://johnbiehler.com/2013/06/11/printrbot-simple-the-300-3d-printer/

Makerbot Replicator 2

Replicator 2 3D Printer

Replicator 2
www.makerbot.com

Resolution: Z axis:100 microns

Materials to Print: PLA

Cost: $2199

Print Volume: 11.2″×6″×6.1″

Website: http://makerbot.com

Twitter Handle: https://twitter.com/makerbot

Link to Reviews: http://makezine.com/review/guide-to-3d-printing-2014/replicator-2

http://3dprintingindustry.com/2013/05/16/the-replicator-2-an-honest-overview-of-the-machine-and-the-experience/

http://3d-printers.toptenreviews.com/replicator-2-review.html

4U Builder

Resolution: Z axis: 0.1mm

Materials to Print: PLA

Cost: $1688

Print Volume: 8.6″×8.25″×6.9″

Website: http://3dprinter4u.nl/en/

Twitter Handle: https://twitter.com/3dprinter4u

Link to Reviews: http://makezine.com/review/guide-to-3d-printing-2014/review-3dprinter-4u-builder

Airwolf AW3D XL

AW3D XL Printer 3D Printer

AW3D XL Printer
www.airwolf3d.com

Resolution: Z axis: 80 Micron

Materials to Print: ABS, PLA, HIPS, nylon, PVA, Laywood, and more

Cost: $2399

Print Volume: 12″×7.9″×7″

Website: http://airwolf3d.com/

Twitter Handle: https://twitter.com/AIRWOLF3D

Link to Reviews: http://makezine.com/review/guide-to-3d-printing-2014/review-airwolf-aw3d-xl

http://3d-printers.toptenreviews.com/aw3d-xl-review.html

http://www.engineering.com/3DPrinting/3DPrintingArticles/ArticleID/5558/AirWolf-AW3D-XL-3D-Printer.aspx

http://www.23dprinter.com/2013/09/airwolf-3d-printer-aw3d-xl-multiple-materials-machine-review.html

http://www.3dprinterprices.net/printers/airwolf-3d-printer-aw3d/

Bukito

Resolution: 50 microns (X,Y), 100 microns Z axis

Materials to Print: PLA, nylon, Laywood

Cost: $799

Print Volume: 5″×6″×5″

Website: http://deezmaker.com/

Twitter Handle: https://twitter.com/deezmaker

Link to Reviews: http://makezine.com/review/guide-to-3d-printing-2014/review-bukito

http://www.tomsguide.com/us/bukito-3d-printer-maker-faire,news-17592.html

http://3dprintingindustry.com/2013/05/29/deezmakers-new-bukito-portable-3d-printer/

Bukobot 8V2

Bukobot 8V2 3D Printer

Bukobot 8V2
www.makezine.com

Resolution: Z axis: 50 Microns

Materials to Print: ABS, PLA, nylon, polycarbonate, PVA, HIPS, Laywood, Laybrick

Cost: $1549

Print Volume: 8″×8″×8″

Website: http://deezmaker.com/

Twitter Handle: https://twitter.com/deezmaker

Link to Reviews:http://makezine.com/review/guide-to-3d-printing-2014/review-bukobot-8v2/

Tinkerine Studios Ditto+

Resolution: Z axis:100 micron

Material to Print: PLA

Cost: $1549

Print Volume: 8-1/4″×7-1/4″×9″

Website: http://tinkerines.com/

Twitter Handle: https://twitter.com/tinkerines

Link to Reviews: http://makezine.com/review/guide-to-3d-printing-2014/review-tinkerine-studios-ditto/

http://mobilemakerspace.com/makerspace-product-review-ditto-3d-printer/

http://solidsmack.com/cad-design-news/the-ditto-3d-printer-diy-hd-fff-3dp/

http://solidsmack.com/cad-design-news/the-ditto-3d-printer-diy-hd-fff-3dp/

http://3d-printers.toptenreviews.com/ditto–review.html

Type A Machines Series 1

Type A Machine Series 1 3D Printer

Type A Machine Series 1
www.typeamachines.com

Resolution: Z axis: 50 microns

Material to Print: PLA, nylon, soft PLA, PET

Cost: $2295

Print Volume: 12″×12″×12″

Website: typeamachines.com

Twitter Handle: https://twitter.com/typeamachines

Link to Reviews: http://makezine.com/review/guide-to-3d-printing-2014/type-a-machines-series-1/

http://www.23dprinter.com/2013/11/affordable-solid-type-a-machines-series-1-3d-printer.html

http://www.pcmag.com/article2/0,2817,2424909,00.asp

http://www.3ders.org/articles/20120821-introducing-four-new-personal-3d-printers.html

Ultimaker 2

Resolution: Z axis: 20 microns

Material to Print: PLA or ABS

Cost: $2565

Print Volume: 8.9″×8.9″×8.1″

Website: http://ultimaker.com/

Twitter Handle: https://twitter.com/ultimaker

Link to Reviews: http://makezine.com/review/guide-to-3d-printing-2014/ultimaker-2/

http://www.gizmag.com/ultimaker-2-3d-printer-speed-accuracy/29268/

UP Mini

Resolution: Z axis: 250 microns

Material to Print: ABS, PLA

Cost: $899

Print Volume: 4.7″×4.7″×4.7″

Website: http://pp3dp.com/

Twitter Handle: https://twitter.com/#%21/PP3DP

Link to Reviews: http://makezine.com/review/guide-to-3d-printing-2014/up-mini/

http://3dprintingsystems.com/products/up-mini-3d-printer/

UP Plus 2

UP Plus 2 3D Printer

UP Plus 2
www.pp3dp.com

Resolution: Z axis: 150 micron

Material to Print: ABS, PLA

Cost: $1649

Print Volume: 5-1/2″×5-1/2″×5-1/4″

Website: http://pp3dp.com/

Twitter Handle: https://twitter.com/#%21/PP3DP

Link to Reviews: http://makezine.com/review/guide-to-3d-printing-2014/up-plus-2/

http://3dprintingsystems.com/products/3d-printers/up-plus-2-3d-printer/

Cubify CubeX

Resolution: Z axis: 100 microns

Material to Print: PLA / ABS / Dissovable Natural PLA

Cost: $2499

Print Volume: 10.8” x 10.45” x 9.5”

Website: http://cubify.com/

Twitter Handle: https://twitter.com/cubify

Link to Reviews: http://3d-printers.toptenreviews.com/cubex-review.html

http://www.engadget.com/2013/01/08/eyes-on-with-3d-systems-cubex-and-next-generation-cube/

Cubify Cube

Resolution: Z axis: 200 microns

Material to Print: PLA plastic and ABS plastic or Tough Recyclable or Compostable Plastic

Cost: $1299

Print Volume: 5.5 x 5.5 x 5.5 inches

Website: http://cubify.com/

Twitter Handle: https://twitter.com/cubify

Link to Reviews: http://3d-printers.toptenreviews.com/cube-review.html

http://www.pcmag.com/article2/0,2817,2418103,00.asp

http://reviews.cnet.com/3d-printers/3d-systems-cube/4505-33809_7-35473913-2.html

http://www.pocket-lint.com/review/123480-cubify-cube-3d-printer-second-gen-review

Lulzbot AO-101

Lulzbot AO 101 3D Printer

Lulzbot AO 101
www.lulzbot.com

Resolution: Z axis: 200 microns

Material to Print: ABS and PLA plastic filaments

Cost: $1725

Print Volume: 200mm x 190mm x 100mm

Website: http://www.lulzbot.com/

Twitter Handle: https://twitter.com/LULZBOT

Link to Reviews: http://3d-printers.toptenreviews.com/lulzbot-ao-101-review.html

http://www.lulzbot.com/?q=news/reviews

http://3dprintingindustry.com/2013/03/01/3d-printer-review-lulzbot-ao-101/

Afinia H

Resolution: Z axis: 150 microns

Material to Print: ABS

Cost: $1599

Print Volume: 200mm x 190mm x 100mm

Website: http://www.afinia.com/

Twitter Handle: https://twitter.com/Afinia3DPrint

Link to Reviews: http://3d-printers.toptenreviews.com/afinia-h-review.html

http://techcrunch.com/2013/11/04/hands-on-with-the-afinia-h-series-3d-printer-a-rugged-printing-rig-for-home-and-school/

AW3D V5

AW3D V5

AW3D V5

Resolution: Z axis: 0.1mm

Material to Print: PLA, ABS and a wood-based PLA filament

Cost: $1695

Print Volume: 200 x200 x112 mm

Website: http://airwolf3d.com

Twitter Handle:

Link to Reviews:http://3d-printers.toptenreviews.com/aw3d-v5-review.html

3D Touch

Resolution: Z axis: 125 microns

Material to Print: ABS, PLA

Cost: $3400-$4200

Print Volume: 275 x 275 x 210mm

Website: http://www.cubify.com/

Twitter Handle: https://twitter.com/cubify

Link to Reviews: http://3d-printers.toptenreviews.com/3dtouch-review.html

http://3dprinters.ws/

http://www.theregister.co.uk/2013/02/04/ten_3d_printers/

http://www.3dprintingera.com/review-of-3d-touch-3d-printer/

Printrbot Jr

Printrbot Jr

Printrbot Jr

Resolution: Z axis: 0.1mm

Material to Print: ABS and PLA

Cost: $699

Print Volume: 5.9inch x 5.9inch x 5.9inch

Website: http://www.printrbot.com/

Twitter Handle: https://twitter.com/printrbot

Link to Reviews: http://3d-printers.toptenreviews.com/printrbot-jr-review.html

http://32b.it/?p=86

http://3dprintx.net/printrbot-jr-review/

http://3dprintingindustry.com/2013/08/19/printrbots-junior-3d-printer-is-all-grown-up-other-things/

Cannonball Allstar

Canonball Allsta

Canonball Allsta
www.3dstuffmaker.com

Resolution: Z axis: 0.05mm

Material to Print: PLA

Cost: $1950

Print Volume: 4.7 x 4.7 x 4.7 inches

Website: http://www.3dstuffmaker.com----escape_sem_autolink_uri:5b0ae5dc5a3a51ebcc3e396774304d72----

Twitter Handle: https://twitter.com/3dstuffmakers

Link to Reviews: http://3d-printers.toptenreviews.com/allstar-review.html

http://www.deskeng.com/articles/aabffp.htm

http://www.testseek.com/computers/printers/3d-printers/thre3d_cannonball_allstar-p-9311ea32-d91e-2e54-7a3b-9b9fb56b5182.html

Fablicator

Resolution: Z axis: 0.1-0.3 mm

Material to Print: PLA, ABS

Cost: $3495

Print Volume: 7 x 7 x 7 inches

Website: http://www.fablicator.com----escape_sem_autolink_uri:5b0ae5dc5a3a51ebcc3e396774304d72----

Twitter Handle: https://twitter.com/fablicator

Link to Reviews: http://3d-printers.toptenreviews.com/fablicator-review.html

Evolution

Resolution: Z axis: 0.2-0.4mm

Material to Print: PLA

Cost: $1295

Print Volume: 8 x 8 x 8 inches

Website: http://www.3dstuffmaker.com/evolution-3d-printer/

Twitter Handle: https://twitter.com/3dstuffmakers

Link to Reviews: http://3d-printers.toptenreviews.com/evolution-review.html

Mega Prusa

Resolution: Z axis: 0.35 mm

Material to Print: PLA

Cost: $1495

Print Volume: 11 x 10 x 8 inches

Website: http://www.3dstuffmaker.com/buy-mega-prusa/

Twitter Handle: https://twitter.com/3dstuffmakers

Link to Reviews: http://3d-printers.toptenreviews.com/prusa-review.html

Hyrel 3D Engine E3

Resolution: Z axis: 0.2mm

Material to Print: ABS and PLA

Cost: $2495

Print Volume: 8 x 8 x 8 inches

Website: http://www.hyrel3d.com/

Twitter Handle: https://twitter.com/HyRel3D

Link to Reviews: http://3d-printers.toptenreviews.com/hyrel-3d-engine-review.html

http://3dprintingindustry.com/2013/09/24/toms-guide-best-3d-printers-2013/


Solidoodle 4

Solidoodle 4 3D Printer

Solidoodle 4
www.solidoodle.com

Resolution: Z axis: 0.1-0.4 mm

Material to Print: ABS

Cost: $999

Print Volume: 8 x 8 x 8 inches

Website: http://www.solidoodle.com

Twitter Handle: https://twitter.com/Solidoodle3D

Link to Reviews: http://3d-printers.toptenreviews.com/solidoodle-review.html

http://www.engadget.com/2013/11/22/solidoodle-4/

DaVinci (Kinpo)

Resolution: Z axis: 0.2-0.4mm

Material to Print: PLA

Cost: $1295

Print Volume: 8 x 8 x 8 inches

Website: http://www.3dstuffmaker.com/evolution-3d-printer/

Twitter Handle: https://twitter.com/3dstuffmakers

Link to Reviews: http://3d-printers.toptenreviews.com/evolution-review.html

Makibox A6 LT

Resolution: Z axis: 0.04mm

Material to Print: PLA

Cost: $200

Print Volume: 150mm x 110mm x 90mm

Website: http://www.makibox.com

Twitter Handle:

Link to Reviews: http://www.licensetoquill.co.uk/2013/05/09/the-best-home-3d-printers-2013/

http://www.fabberforge.com/fabnews/2012/12/29/makibox-a-complete-3d-printer-for-200.html


Makibox A6 HT

Makibox A6 HT 3D Printer

Makibox A6 HT
www.makibox.com

Resolution: 100 microns

Material to Print: ABS, PLA

Cost: $300

Print Volume: 150mm x 110mm x 90mm

Website: http://www.makibox.com

Twitter Handle:

Link to Reviews: http://www.licensetoquill.co.uk/2013/05/09/the-best-home-3d-printers-2013/

http://3dprintingindustry.com/2012/12/18/makibox-a6-affordable-reliable-and-simple-3d-printer-project/

The Buccaneer (Pirate 3D)

Resolution: 85 microns

Material to Print: PLA

Cost: $347

Print Volume: 145mm x 125mm x 155mm

Website: https://pirate3d.com----escape_sem_autolink_uri:5b0ae5dc5a3a51ebcc3e396774304d72----

Twitter Handle: https://twitter.com/pirate3d

Link to Reviews:

3D P01 (Heacent)

Heacent 3D Printer

Heacent 3D Printer
www.heacent.com

Resolution: Z axis: 0.004mm, (X,Y): 0.012mm

Material to Print: PLA

Cost: $388

Print Volume: 200mm x 200mm x 100mm

Website: http://www.heacent.com

Twitter Handle:

Link to Reviews:

Sumpod MDF Delta

Sumpod MDF Delta

Sumpod MDF Delta
www.sumpod.com

Resolution: 0.02mm all axis

Material to Print:

Cost: £349.00

Print Volume: 180mmx180mmx200mm

Website: http://www.sumpod.com----escape_sem_autolink_uri:5b0ae5dc5a3a51ebcc3e396774304d72----

Twitter Handle: https://twitter.com/SUMPOD

Link to Reviews: http://solidsmack.com/software-hardware-reviews/the-sumpod-3d-printer-review/

Sumpod Aluminum V2

Sumpod Aluminum V2

Sumpod Aluminum V2
www.sumpod.com

Resolution: Z axis: 0.02mm

Material to Print:

Cost: £799.00

Print Volume: 220mmx220mmx150mm

Website: http://www.sumpod.com

Twitter Handle: https://twitter.com/sumpod

Link to Reviews: http://solidsmack.com/software-hardware-reviews/the-sumpod-3d-printer-review/

Sumpod Mega

Sumpod Mega

Sumpod Mega
www.sumpod.com

Resolution: Z axis: 0.02mm

Material to Print: PLA and ABS

Cost: £3,000

Print Volume: 600mm x 600mm x 600mm

Website: http://www.sumpod.com

Twitter Handle: https://twitter.com/sumpod

Link to Reviews: http://solidsmack.com/software-hardware-reviews/the-sumpod-3d-printer-review/

Leapfrog BV Xeed

Resolution: X,Y,Z axis: 12 microns

Material to Print: ABS, PLA, PVA

Cost: $7054

Print Volume: 600 mm x 800 mm x 500 mm

Website: http://www.lpfrg.com

Twitter Handle: https://twitter.com/Leapfrog_3D

Link to Reviews:http://3dprintingindustry.com/2012/10/03/leapfrog-a-step-closer-to-easy-to-use-3d-printing/

Robo 3D

Resolution: Z axis: 100 microns

Material to Print: ABS, PLA

Cost: $699

Print Volume: 254 mm x 203 mm x 254 mm

Website: http://www.robo3dprinter.com

Twitter Handle: https://twitter.com/robo3dprinter

Link to Reviews:http://exprinted.com/robo3d-printer-review/

http://3dprinters.ws/

http://www.licensetoquill.co.uk/2013/05/09/the-best-home-3d-printers-2013/

http://www.gadgetreview.com/2013/11/10-3d-printers-for-under-1000-that-anyone-can-use-at-home-today.html

Portabee Go

Resolution: Z axis: 100 microns

Material to Print: PLA

Cost: $395

Print Volume: 120 mm x 168 mm x 135 mm

Website: http://www.portabee3dprinter.com

Twitter Handle: https://twitter.com/portabee3d

Link to Reviews: http://3dprintingindustry.com/2013/11/22/portabee-go-portable-3d-printer-go/

http://forums.vr-zone.com/chit-chatting/2904838-review-portabee-3d-printer-the-most-afforable-singapore.html

Revolution 3D (QU-BD)

Revolution 3D

Revolution 3D
www.qu-bd.com

Resolution: Z axis: 100 microns

Material to Print: ABS

Cost: $999

Print Volume: 6” x 5.5” x 5.5″

Website: http://www.qu-bd.com

Twitter Handle:

Link to Reviews: http://www.gadgetreview.com/2013/11/10-3d-printers-for-under-1000-that-anyone-can-use-at-home-today.html

http://www.gizmag.com/qu-bd-one-up-3d-printer/29760/

http://machinesonthemind.blogspot.in/2013/09/qu-bd-revolution-xl-review-part-1.html

CB Printer

Resolution: Z axis: 0.1 mm

Material to Print: Acrylate Photopolymer Resin

Cost: $2146

Print Volume: 200mm x 200mm x 180 mm

Website: http://www.cb-printer.com

Twitter Handle:

Link to Reviews: http://3dprintingindustry.com/2012/10/23/cb-printer/

http://www.licensetoquill.co.uk/2013/05/09/the-best-home-3d-printers-2013/

Objet Connex 500

Objet Connex 500

Objet Connex 500
www.stratasys.com

Resolution: X-axis: 600 dpi; Y-axis: 600 dpi; Z-axis: 1600 dpi

Material to Print: ABS and other materials.

Cost: $250,000 (estimated)

Print Volume: 500mm x 400mm x 200mm

Website: http://www.stratasys.com

Twitter Handle: https://twitter.com/Stratasys

Link to Reviews: http://www.licensetoquill.co.uk/2013/05/09/the-best-home-3d-printers-2013/

http://www.core77.com/blog/technology/tool_porn_the_connex500_20467.asp

http://solidsmack.com/fabrication/this-is-what-an-objet-connex500-printed-3d-printed-record-actually-sounds-like/

http://tech2.in.com/features/printers/tech2-checks-out-the-connex350-worlds-only-multimaterial-3d-printer/302612

http://www.engadget.com/2011/07/10/objet260-connex-makes-3d-printing-cheaper-feasible-for-cramped/

Pirx

Resolution: 100 microns

Material to Print: Acrylic

Cost: $799

Print Volume: 160mm x 250mm x 150mm

Website: http://pirx3d.com/

Twitter Handle: https://twitter.com/pirx3d

Link to Reviews: http://www.tested.com/forums/makerbot/459298-pirx3d-3d-printer-from-poland/


The week’s most interesting Tech Stories

Nasa puts Saturn Launchers up for sale

Dr Evil - Credit Austin Powers

Dr Evil – Credit Austin Powers babe

NASA has decided to put the historic Saturn Rocket Launchers up for sale. Megalomaniacs and world dominators can apply here http://www.nasa.gov/

It will be interesting to see if anyone actually has a spare desert island to put them on. But in all seriousness would it be better for a new space company to use the old units, or build new facilities? Has state of the art moved on? You would have to think NASA has learnt a lot in this time, but I guess in the world of big

The launchers have been in mothballs for some years and have had large quantities of parts removed and reused on newer programs.

Thunderbirds are go

Thunderbirds are go


Saturn Launcher in mothballs Credit NASA/Kim Shiflett

Saturn Launcher in mothballs Credit NASA/Kim Shiflett


Saturn Launcher on the way to launch Saturn V - Credit Nasa

Saturn Launcher on the way to launch Saturn V – Credit Nasa

The units are up for tender and whilst they have been cannibalising them they have left it intact for a commercial entity who wants to use this to launch a liquid fueled commercial rocket.

The question is, who is going to tow it?

Blade Electric Vehicle launches Pozible.com Campaign

Blade Electric Car Motor - Credit Blade Electric Cars & Pozible.com

Blade Electric Car Motor – Credit Blade Electric Cars & Pozible.com

Ross Blade has produced Electric cars for a few years but he now trying to ramp up production. The amazing thing about this is that he has managed to build 50 Electric cars without Government support. You can find the full history of his business here http://blade.id.au/

Ross is trying to get a workshop launched in North Sydney so that he can achieve his goal of producing 250 cars this year.

Ross Blade with one of his electric cars - Credit Pozible.com & Blade Electric Cars

Ross Blade with one of his electric cars – Credit Pozible.com & Blade Electric Cars

Whilst they are not that powerful and they are pretty expensive to buy if you power them on off peak electricity it costs about $3 per 100km. That is about 1/3 the cost of petrol. Probably perfect for Council cars and short commutes and as he increases volume no doubt he can drive unit costs down.

Blade Electric Car Pricing

Blade Electric Car Pricing

My dream is that you have something super sexy that runs off Solar Panels at your house so you could potentially run your car for nothing.

Personally I think Ross should consider retrofitting Mazda MX5s or Lotus Elise with a slightly more powerful version, 100kw would be enough to make them comparable to their original spec and make them sexy, more Tesla and less shopping trolley and more likely to get attention and free marketing (I am interested in this stuff and this is the first I had heard of it)

You can support his campaign here.

http://www.pozible.com/project/29199

Makerbot announces 3D Digitizer

Makerbot Digitizer - Credit Makerbot.com

Makerbot Digitizer – Credit Makerbot.com

Hot on the heels of the announcement of the Makerbot 2X a bigger faster more accurate version of the original Makerbot Replicator comes the Makerbot Digitizer.

Makerbot 2X - Credit Makerbot.com

Makerbot 2X – Credit Makerbot.com

Often the application of 3D printers has been goofy little characters and things that are not particularly useful, primarily because building something useful requires a significant capability in 3D drawing software and some design and fabrication experience to know how to build things.

The Digitizer now makes it possible to put an object in and reproduce it on your Makerbot in a very short time. What it does is uses two lasers to build a point cloud of the object as it rotates, they capture 1000s of points which is then translated into a 3D model.

So if you want to reproduce a set of models or a part it can be done very quickly and easily. While the form factor is still relatively small on the printing side these are getting bigger and faster and using more sophisticated materials with smaller step sizes producing better finishes and great accuracy.

Makerbot is taking orders for $1400 www.makerbot.com

New Porsche Turbo S Released

This is nothing to do with Startups (except you get to buy one if you get a good exit) however I thought it was time for some great car porn. At $441,000 plus on road costs it will want to be a good exit 🙂

Porsche Turbo S Side - Credit Porsche Australia

Porsche Turbo S Side – Credit Porsche Australia

Porsche Turbo S Interior - Credit Porsche Australia

Porsche Turbo S Interior – Credit Porsche Australia

Autonomous Quadcopter uses a Smartphone to navigate and make decisions

Autonomous Quadcopter - Credit Vienna University of Technology

Autonomous Quadcopter – Credit Vienna University of Technology


A Student team from the Vienna University of Technology has designed and built a completely autonomous quadcopter. All the required computing power is provided by an off-the-shelf smartphone.

The quadcopter, which was developed at TU Vienna, can negotiate its way through a room completely on its own. It does not need any human interference, and in contrast to other models, it is not assisted by any external computer or controller. All the necessary computing power in on board; the image processing is done by a standard smartphone.

http://www.youtube.com/watch?v=sRv9F5RyCZQ&feature=youtu.be

Autonomous Machines

Quadcopters have become a popular toy for academic research. The small aircraft, powered by four electric engines, are perfect for testing advanced feedback control systems, which make them fly steadily and safely. But beyond that, quadcopters are also used to test how machines can be made to perceive their environment and act autonomously.

The Virtual-Reality-Team at Vienna University of Technology has been working with visual data for many years. “Proceeding towards robotics and mounting a camera onto a quadcopter was just the logical next step for us”, says Hannes Kaufmann (Faculty of Informatics, TU Vienna). Usually, quadcopters are steered by humans or they send their data to a powerful earthbound computer, which then returns the necessary control signals. The Vienna quadcopter, however, does not need any external input.

A Smartphone as the Eyes and Brains

This is the Quadcopter-Team: Annette Mossel, Christoph Kaltenriner, Hannes Kaufmann, Michael Leichtfried (l.t.r.). Credit Vienna University of Technology

Quadcopter-Team: Annette Mossel, Christoph Kaltenriner, Hannes Kaufmann, Michael Leichtfried (l.t.r.). Credit Vienna University of Technology

The team decided not to buy an expensive commercial quadcopter-system, but instead to assemble a simple, cost-efficient quadcopter, using carefully selected components. The core element – and the most expensive part of the quadcopter – is a smartphone. Its camera provides the visual data and its processor acts as the control center. The quadcopter’s intelligence, which allows it to navigate, was coded in a smartphone-app.

ArduSat has launched a kickstarter campaign to allow you to run your own Space Experiments

Ardusat - Credit Kickstarter.com

Ardusat – Credit Kickstarter.com

Never thought about it before but it would be difficult to run space experiments without your own platform, I can’t imagine that Governments and major corporates would be that accommodating. Accordingly ArduSat has launched a kickstarter campaign to provide time on their Satellite for experimental purposes and so far has achieved $106,000 on a $35,000 goal with 670~ backers.

Libelium is a company that is using Ardusat to launch their Radiation Sensors and test them, you can see their story here http://www.libelium.com/libelium-sensors-will-reach-the-space-in-5-days/

Ardusat launches Libelium Sensor into Space - Credit http://www.libelium.com/

Ardusat launches Libelium Sensor into Space – Credit http://www.libelium.com/

Space is being democratised


Any stories I missed or if you have a story let me know in the comments or use the contact form


Related articles


Enhanced by Zemanta