Hardware

Prototyping Hardware – 15 Lessons Learnt the Hard Way

I started writing this article 6 months ago, but such is the nature of hardware, you think its going to be a 3 month project but it turns into 12. I am not an electrical engineer by trade, although I spent the first part of my working life working on aircraft and components so I am used to building things.


A man who carries a cat by the tail learns something he can learn in no other way.

Mark Twain

This quote always makes me laugh, just in case you don’t get the idea, essentially it means you sometimes have to do things and make your own mistakes, people can tell you what will happen but until you screw it up yourself and learned your own lessons you really don’t understand.

And so it is with prototyping hardware.

Cartesian Printed Circuit

Cartesian Printed Circuit

Over the last 6 12 months I have been prototyping a health sensor, packaged as a wearable smart device. The device essentially acts as a dashboard for your body measuring a number of vital signs. I would love to include photos but this is still under wraps.

To pull this project together we engaged a hardware mechatronics engineer who was responsible for prototyping the circuits that would form the basis of the device and a software engineer to build a mobile app as well as an industrial designer to help build a casing that would allow it to be tested and look cool at the same time. Recently we added a bunch of microcontroller firmware programmers.

When you are building an invention that has never been made before there is a lot of trial and error to get something that works correctly, is reliable and robust enough to work in the real world.

One of the requirements of patenting an invention is the provision of enablement, that is all the instructions needed to build the invention, however

there is a world of difference between a working invention on a test bench and a product that works properly on a human with a competitive feature set in an attractive design and form factor.

Humans are rather inconvenient. Very few people are exactly the same size, height, weight, body type or age. The diversity is amazing.

The concept and the science was solid, however it had never been built before, no one had ever worked out what circuit would be needed to drive the invention or a bill of materials or the life support system needed to make it operate such as battery, charging circuit, screen and voltage regulators.

Nor was there any pre-built micro-controller packages (ie power, memory, charging, Accelerometer, GPS etc) small enough to fit the form factor.

We had our opinions but we had to experiment with different sizes to find out if it could be built at a size that made it suitable for a smart watch or wearable device.

10 years ago the circuitry and processing power needed to run this would have required a backpack to transport the computer and battery pack, now it was being shoehorned into a 25mm square PCB.

While we did a lot of things right and the consensus is we made a lot of progress in a very short time, we did learn a lot of lessons the hard way so I decided to share these in the hope you don’t have to repeat them.

Teamwork, continuous integration and change control

Hardware is hard for a bunch of reasons but one of the key reasons is its not just hardware that has to work. Most hardware projects comprise hardware, device software, mobile app and cloud app. Most Web or App start-ups are only trying to build one or two of these.

It gets harder when you have a number of people all working around a very small device who need to co-ordinate tasks across physical, electrical, mechanical and three different software stacksto produce a result and their work has to dovetail with the others to deliver a working product whilst every aspect of the design is in a state of flux.

One of the mistakes I made was not forcing the hardware and firmware engineers, the mobile app developer and the industrial designer to sit alongside each other and look each other in the eye all day every day.

Its very tempting for each discipline to meet, agree some concepts and action items then separate and do their own work and come back to the group with a nearly completed result.

The trouble with this is that new hardware prototyping projects are in a constant state of flux and improvement and so without the the whole team involved in every change, you will find they produce things that don’t fit because the board is no longer the same size or has new components.

Or in the case of software, one of the teams will develop a functionality, that needs to connect to both the Mobile App and the Cloud Web Service, or worse will make a breaking change.

Unless they are working closely, daily and tracking their dependancies it will all go to shit very quickly or you will think something is done but it is only done on one part of the system.

Worse the person responsible might give the impression that the feature works (which in my eyes unless explicitly qualified means it that works for the user) but in fact their small part of the system works.

There may be other pipes to connect or major work required to complete the other aspects and unless the Feature was being tracked on both device, mobile app and cloud there is every chance you won’t find out about this missing part until it becomes critical.

Obviously this is more critical as the device gets smaller, but the same general principles apply regardless of size, arguably they are more important as the complexity of the project increases and the size of the device decreases.

Update: We have recently implemented Slack App with integrations to Trello for task management and Github for Software Version Control this is giving us fantastic results in closing the loop on problems and driving faster development.

Slack-Chat

Trello

Trello

Version Control

Its tempting to think because its a tiny little microcontroller that disciplined version control is not required.

Nothing could be further from the truth.

Generally speaking in hardware prototyping Microcontroller programming is a solitary job. Most of you will be working on something on your own or might have a small team and you have divvied up firmware and hardware.

There is a temptation to not bother with strict version control discipline.

Even if you only have one person involved in the firmware development you must implement good version control routines.

Without good version control bedlam will reign on the prototyping bench.

Whilst excellent technical solutions exist to version control in teams it is a largely human problem.

Github


Most of our team members had run their own projects or done solo projects for others but had not had to work in a larger development team.

Trying to get a bunch of disparate software, hardware, firmware and mobile developers to jointly use Github.com as part of their daily workflow was somewhat challenging.

Anyone is welcome to comment on how screwed up my Github philosophy is, I am just describing how we created some semblance of order from chaos, undoubtedly there is a much better way to do it.

Here are some of the resources we used around how to setup a Github workflow

https://coderwall.com/p/wxowig

http://blog.codinghorror.com/check-in-early-check-in-often/

http://sethrobertson.github.io/GitBestPractices/

http://www.databasically.com/2011/03/14/git-commit-early-commit-often/

http://www.git-tower.com/learn/ebook/command-line/appendix/best-practices

http://nvie.com/posts/a-successful-git-branching-model/

https://github.com/janosgyerik/git-workflows-book/blob/small-team-workflow/chapter05.md

http://www.mentalbrew.com/blog/2011/10/11/a-simple-git-workflow/

Our Github Guidelines

  • Commit Early Commit often + Use Branching
  • We will have a master + branches.
  • We will have a Master which can be deployed at any time
  • New Feature=New Branch
  • We will commit frequently to our branches (at minimum daily but more often if a small part of the code works)
  • We will do good comprehensive commenting in both the commits and also the code.
  • The whole feature does not need to be working but each feature should be broken down into small subsets and at least one of these should be working when committed (and the commit comment should describe what is and isn’t working)
  • As a programmer believes their feature is working they should apply to have this merged with the master.
  • Merges should happen very regularly
  • One of the other team members will review and merge

Also you might have this working nicely but again because its a human problem it can all fall into a pile of shit in a short period of time without constant discipline.

Testing beats Beauty

Its easy to test software as you go, invariably when building experimental hardware inventions you have to build significant parts of the device before you can start to test key functionality of hardware especially when its experimental.

Form follows Function.

Ferdinand Porsche

Yes you can use a breadboard and initially you probably should however this is not useful in a wearable sensor build as breadboards are not particularly wearable nor are the circuits robust.

Also increasingly many new components are not available in through hole mounting so you need to work out how to do surface mount anyway.

Whilst product beauty is essential for success in the market and for raising funding , in my opinion there is very little point designing beautiful casings or industrial design when you are still prototyping the circuits and sensors and their functionality is not well understood yet, depending on the hardware type it is possible your design will have to change dramatically to give the functionality you need.

Our key sensor needed to be consistently close to the skin, the original industrial design was beautiful but physically it could not keep the watch in contact with the skin consistently nor was the material rigid enough to make it robust.

Subsequent designs overlooked key physical constraints of operating on a moving human.

We should have started serious testing of the key inventive aspect a lot sooner and would have saved a lot of time and effort on design and circuit fabrication that ended up being superseded when more rigorous testing uncovered new learning.

The importance of early and constant hardware testing cannot be understated

Its tempting to try to get a nice looking product together before you start rigorous testing, but a more efficient approach is lots of individual circuit and sensor testing especially testing known working or reference designs vs unknown circuits before assembling them all and testing together.

To be fair we did a lot of electronics testing during the whole process, but in hindsight I would have spent a lot more time a lot earlier on testing the implementation on a number of different humans and body parts.

Getting a device working reliably on a human is very different to getting it working on a test bench.

Warning Industrial Designers don’t have to build what they design (and they know it).

I am not singling Industrial Designers out, each of the disciplines has their own idiosyncrasies, however you as the project manager need to understand they are not designing with manufacturing in mind.

They are focused on beauty and cool, not on whether it can be built or if suitable components are available.

This is where it can get potentially expensive very quickly. Remember you are not Apple. A recent article by Bolt.io the hardware incubator from Boston details the lengths Apple goes to in their pursuit of perfection.

My favourite is that when they decided to make 1 million Macbooks Apple purchased 10,000 CNC Mills to make the aluminium bodies.

The lonely prototyper can’t afford to make a new alloy or touch screen glass to achieve some amazing experience.

Largely what you build must use existing technologies, materials and manufacturing processes. Very few prototypers have the budget to develop completely new technologies or materials.

However Industrial Designers do work with the full knowledge that they don’t actually have to manufacture their designs themselves or fix the inevitable materials problems or deal with the electronics issues of is there large enough space for a battery or even if such a small battery exists.

The onus is not on them to ensure their design is going to be manufacturable from an electrical, materials and mechanical perspective.

This problem belongs to the Mechanical and Electrical Engineers, who is often not from the same firm.

Yes thats right you will need to engage a separate group Mechanical Engineering to actually mechanically implement what the industrial designers design in the appropriate materials and the three groups EE, ID & ME will go back and forth with each other negotiating about how the thing of beauty will turn into a real physical device that can be manufactured that actually will still work electronically and fit within cost constraints.

It came as somewhat of a surprise to me that none of the aforementioned is their problem, they expect that the mechanical engineers will take care of all of these issues.

Of course they are not deliberately inconsiderate, but I have seen well known and successful designers, design beautiful product which is almost un-manufacturable.

Remember, they are the your advisor not the client.

They will want to do very cool things and you should co-operate wherever possible because this is what you are paying them for, however at some point you are going to have to pull them up when they start designing problems into the product.

Seriously this is how it operates.

You have been warned.

Be prepared to throw your prototype away and start again.

You start the design process with some assumptions about mostly unknowable things. You can spend weeks or months researching, but in the case where you are building a new invention you really need to grab the PCB and Etchant and build a board and test it.

Unfortunately sometimes you are going to get it very wrong, even if you have spent a stack of cash, you have to consider killing the prototype and starting afresh.

We found that once we got to a meaningful level of testing on an actual human there was no way our original design (based on flexible circuit board and silicon bands) was going to survive contact with the customer.

We abandoned both physical design and electrical layout and moved from Flexible to super thin PCB (the logical circuit design and components were ok, but we had to start from scratch on the circuit layout) and squeezed the designs into two 25mm square boards (for reference purposes the smallest commercially available arduino board is about 40mmx40mm and multilayer)

This was a very hard decision, we had spent 8 weeks and a lot of money on this, but the decision turned out to be the right one, we managed to get the redesign done in 4 days and the device working reliably in under a week.

So be prepared to throw your latest revision out and start again again.

Prototyping & Physical Design

Buy a decent 3d printer <100 micron resolution preferably 50 micron that can print numerous material types, including flexible materials or just resign yourself to find an Objet at a service bureau somewhere and pay $100-200 per print.

We ended up with a Makerbot Replicator 2X (this is the experimental one) I can recommend it, not as accurate as an objet (almost nothing is) but can print numerous different materials, including flexible, wood like material, fluro and conductive ABS and is about 1/10th the price and costs much less to run. Update: We have had a lot of trouble keeping this running smoothly, prints seem to screw up regularly.

Makerbot2X

We screwed around for a few months designing a fantastic looking watch band and casing and then getting 20 of them built overseas only to find that a, this was never going to be manufacturable and b. it wasn’t at all robust and didn’t allow the sensors sufficient contact, in fact the band material was very soft and didn’t have sufficient stiffness to hold the electronics properly and many aspects didn’t fit correctly despite what looked like a very good design and CAD work and numerous man hours spent between the electrical engineer and the industrial designer (more about that in a minute).

When we started using an Objet 3D printer at a local bureau we very quickly iterated and made numerous major physical design changes in the space of a few weeks and now we have a robust device that looks and feels like a good candidate for field testing but if we had of continued on the previous path we probably would have still been stuck.

While we have salvaged some of the designs there was a month of wasted time in trying to get a physical design to work that was fundamentally flawed.

A week with a 3D printer would have identified this problem must sooner and with a few iterations would have resolved it quickly.

Components, Fabrication & Assembly Leads & Lags

Another reason hardware is hard is that there are long leads and lags in the design and fabrication process.

Every time you have to resign a circuit, its another 7-45 days to redesign, order parts from overseas, etc etch new PCBs and then solder them together and test or have them assembled on an SMD machine.

In software you can change, deploy and test numerous times a day and many companies do this on a continuous deployment basis.

Not so with hardware.

There are a few ways you can mitigate this.

Move to Shenzhen

This is a new title, I only added it this morning after visiting Shenzhen last month. Shenzhen is the hardware capital of the world, prototypes can happen a lot faster here than in other parts of the world.

Shenzhen New - Credit: Yuan2003

Shenzhen New – Credit: Yuan2003

Be warned its not all smooth sailing, you should be concerned about cultural and communication issues, about theft of your design by suppliers, vendors who are not certified (RoHS, CE etc) being given crap product or not what you agreed.

However after you see the ready availability of mechanical and electrical components in their wholesale trading markets you will understand how this can speed up the prototyping process, we have written a few stories about our visits to Shenzhen here.

So I advise you to get on a plane and spend a month there, I believe it will save you 3-6 months time in the Western world.

Important note concerning buying electronics components in China. You need to be clear what you are buying, processors or genuine brand name items may be counterfeit or recycled. There might be questions over their certifications or compliance. Caveat Emptor.

Ordering Components & Idle Time

Order more components than you need and ship them express. Changing your layout for your Website or App is reasonably trivial and mostly can be done with minor code changes, rarely a complete rewrite.

With hardware you may be discarding your components and logical design and completely rebuilding boards.

When you change your hardware design frequently as you learn and improve your implementation it might seem you are burning through components and wasting money, but this pales in comparison to the opportunity cost of having your engineers idle if you have to wait for overseas component shipments.

We had a few weeks of very slow progress waiting for equipment to arrive that might have been improved with earlier ordering and ordering more than the design called for.

Its tempting to think this is wasteful(I am a tight arse and it grates on me), but in my experience we might be talking about $100-200 in parts but a wasted day for an engineer costs -/+$500 and it’s easy to lose 4-5 days when waiting for overseas shipments.

Inevitably you will also break or waste components, if you have ever had to go searching for a 0201 resistor (smaller than I can see with my glasses), that has jumped out of your tweezers you will understand.

You need to provision for wastage.

The lesson here is order as early as you can, pay the extra $50 for express shipment and order 2-3 times as many as you think you will need, arguably buying a huge starter pack of standard and SMD components is a good investment as well.

Alternative Suppliers & Components

There may be alternative suitable components that suit your design and other suppliers who can supply it both locally and from overseas, sometimes an alternative might require an alternative board designs (this could be an issue with FDA approved devices) but if you actually manage to hit the big time and the orders are flowing and you can’t get the original components moving to an alternative design is better than not being able to supply.

These are the most popular, some have Asia Pacific Offices as well as US

  • Avnet
  • RSOnline
  • Element14
  • Digikey

You should assess if the components are going to be able to be supplied with consistency. We have noticed in some cases large companies who have fantastic looking processors but they are very difficult to get samples for testing. They often don’t deal directly with the normal components supply chain (Mouser, Digikey, Element14, RSOnline, Avnet) and want to know your forecasts and when you want them before they will provide. (It took me more than 2 months to get a datasheet off one of the big guys and I work for a $6 billion investment fund, 8 months later I still don’t have a sample)

One of the best sites to plug your Bill of Materials into is Octopart.com you can detail all the parts you need and they will display a list of each distributor who holds that part and more importantly will give you the ability to predict costs at volume but allowing you to find alternative suppliers and work out price breaks.


Octopart.com

Octopart.com

PCB – Make your own or outsource?

Australia like many non manufacturing countries doesn’t have much of a PCB/Electronics manufacturing industry so you can’t just duck down the road and get an updated PCB design fabricated as most of the work is sent offshore.

Initially we started off with basic single layer boards which is easy and fast, later we were building two layer Flexible film circuits using a flexible kapstan copper film and we couldn’t even locate the material locally, it had to be shipped in from overseas.

All the companies who claimed to be able to do this were shipping the work to China with a 2-3 week turn-around time. We couldn’t afford that downtime so initially we decided to make them locally by hand.

PCB Tutorial - Intructables.com

PCB Tutorial – Intructables.com

There are a stack of good tutorials on how to do this on Instructables.com but if you want to save time, go straight for the 600dpi laser printing in conjunction with glossy paper and an Iron, having tried a Sandwich press, a laminator and various transfer materials this is what worked best for us.

Making our own was the right decision initially, it gave us a lot of flexibility and we could turn them round in a few hours but what we found though as our circuits got more complex and much smaller, hand fabrication was not very efficient especially the toner transfer aspect was difficult to get right on the very fine traces and we would end up having to to do minor reworks on every board we made.

As our requirements called for smaller designs with higher density and the functionality of the designs was proved it made sense to move to multilevel boards and send this to a prototyping company with the correct equipment.

The lesson is that initially speed and iteration is more important than precision and complexity but as your prototype progresses closer to production complexity increases, you need to go multilayer and speed slows.

Update: Found some locally who can turn these round in 7 days.


Surface Mount Designs.

We had to breadboard circuits initially, however as many of the sub component designs were available as reference designs from the chip manufacturer, which means you waste a stack of time testing buying through hole components and breadboarding what is a known design and then you have to build a surface mounted version

In hindsight now we are far more comfortable with the process I would suggest that you start with SMD components wherever possible.

Hand soldering SMD components is fiddly and can lead to suboptimal results however most of you probably think its not possible to do SMD without a specialised oven. (they are actually pretty cheap approx $250 SMD Oven on Ebay)

Soldering one of the worlds smallest component 2mmx2mm

Soldering one of the worlds smallest component 2mmx2mm

Well you have to ask yourself what would MacGyver do?

You might be thinking you can’t solder SMD on your bench at home, well here is a trick that has worked very well for us. Its a $20 sandwich toaster and a temperature probe from a $15 Multimeter. Check the SMD soldering requirements for your paste, run the sandwich toaster up to temperature (they normally cook above the required solder temperature) and then check the temperature output on the Multimeter (or you can actually see the solder melt on some of the more obvious components, you can watch it as it happens across the board almost simultaneously).

WARNING: Clearly you cant reuse the sandwich toaster for food, just buy one for this job, they are cheap. Also you can get soldering stations for <$200 which have a reflow hot air gun which might work for some designs.

Reflow SMD soldering saves hours of very difficult hand soldering and is produces a far better result than you can manage with a solding iron.

New high tech PCB Prototyping equipment


Originally we did everything on a breadboard using through-mount components

Through Mounted Components

as this was the commonly accepted way of doing things, but it presents a problem.

You need to use normal components through mounting but none of the cool new chips you will want use is going to be through mount, no one makes devices like this anymore, so you will be using SMD components sooner than later.

SMD Components

SMD Components

In hindsight and going forward we will start all new designs with SMD components.

SMD components are so small that if you start to get to any level of complexity you will need to get a PCBA Assembly provider or your own pick and place machine (I think if you are doing any more than 5 assembled boards a year with anymore than 20 per run this will probably pay for itself very quickly in saved time and heartache)

Resistors on Match Head - http://www.indium.com/

Resistors on Match Head – http://www.indium.com/

Getting to Production.

We are almost at the point were we are trying to build boards that are production ready.

Different fabrication companies have different design rules about what you can make in their plant and how boards have to be laid out in order to manufacture them.

Most companies have design guides but these are usually only given out once you have established contact or a relationship with them.

Here are a few PCB design resources I found

http://www.youtube.com/watch?v=VXE_dh38HjU

http://www.youtube.com/watch?v=Uemr8xaxcw0&feature=share&list=PL3C5D963B695411B6&index=23

Each company will be different so check the design you want to build can be built by your supplier.

The biggest issue is around size of components. If you are designing with 0201 size some assemblers may not be able to handle them, just depends on their machines.

Also there are a few players trying to disrupt the electronics prototype and production process by helping you to design your PCB and then either providing prototype boards or in the case of Circuithub.com turning it into a production version with enough volume to satisfy most new product launches and Kickstarter projects.

Seeed Studio - Propagate

Seeed Studio – Propagate

If you don’t have all the equipment don’t let this get in the way have a look at

Be unreasonable and always question objections

When one of your team or an interested party tells you something can’t be done you must question it, in my experience its usually the start of a great step forward or an insight.

By insisting on people finding a way to do things they believe are impossible you almost always take steps forward. Sometimes big steps. Sometimes you end up with egg on your face as well but thats ok.

You don’t have to know how to do ir, you just have to know it can be done.

When engineers told me they couldn’t squeeze anymore chips onto the admittedly tiny motherboard for the smart watch, I asked them to look at the Apple 5S teardown photo below.

Its challenging however there is hardly a wasted space on these boards, the designers are elegant in their space efficiency.

Its easy to say well they are Apple you expect this, my answer is me too :).

iphone-5-logic-board-front-and-back Credit - http://www.extremetech.com/

iphone-5-logic-board-front-and-back Credit – http://www.extremetech.com/


Tools & Equipment

You either find a great Hackerspace (worldwide list of hackerspaces) that has all the equipment or you are going to buy this within the next few months, better to flex the plastic and get it done.

  • Computer Controlled Soldering Station with Hot Air Gun (dont just buy the basic one, you will end up buying the good one later) $100-200
  • 3d Printer – Something that can do more than PLA, ie ABS, Flexible, different textures etc and preferably two heads (Makerbot 2X or Hyrel both good but expensive) $2000-5000
  • 6 pack of pliers of various shapes and sizes $20
  • Component Drawers to keep all your tiny bits $10
  • Magnifying Glass with LED lighting ring $50
  • 200x Magnifying glass with USB connection to your PC $100
  • Dremel with stand and all the attachments. $150
  • Reflow Oven or Rework Station $250
  • Wire Strippers $10
  • Mini Vice, 3rd hand/Jewellers Vice $20
  • Soldering Station Exhaust Fan with filter $50
  • Safety kit, masks, eyes, ears, skin $100
  • Multimeter $20
  • Signal Analyser (might be better to rent)
  • Development Kits for the Microcontroller you are working with $100-300

Wish List

  • Pick and Place Machine $5000-7000 (make sure they can do the component size you need) I know this is a lot of money however if you can turn around prototypes in 2-4 days not 2-4 weeks you will pay this back extremely quickly and there is a major opportunity cost to slow prototyping.
  • Circuit Board Printer like the Cartesian ArgentumCartesian Argentum $2000-2500

Move Fast and Make Things

Instead of theorizing and pontificating about if a certain design will work better or solve a problem get cracking and make it, nothing solves an argument like a working device or not.


What are you working on?

Our readers love to hear about new hardware startups and hobbyist projects.

Leave me a message in the attached form about your product and I will write up a story about it

[contact-form subject=’Startup88 – Feedback Form What are you working on?’][contact-field label=’Name’ type=’name’ required=’1’/][contact-field label=’Email’ type=’email’ required=’1’/][contact-field label=’Website’ type=’url’/][contact-field label=’What are you working on?’ type=’textarea’ required=’1’/][/contact-form]


Is this the best place in the world to prototype hardware? Visiting Shenzhen

SEG Plaza Shenzhen - Credit Wikipedia

SEG Plaza Shenzhen – Credit Wikipedia

Shenzhen is the best city in the world for Makers, Hackers and anyone who needs to build physical product. After two visits I am convinced you are crazy to build electronics or hardware in any other part of the world.

I just returned from a trip to Hong Kong and Shenzhen. It was my first time into China, I found Hong Kong exciting but exhausting and despite the stories I had heard about Chinese cities I found Shenzhen to be very clean, safe and it just seemed to work really well as a city, traffic was ok, the metro was very efficient, streets were clean and the people polite.

Large buildings on spacious green city blocks stretched for as far as the eye could see for such a populated hub of industry it is very pleasant. 30 years ago Shenzhen was a small regional centre, now its estimated that there are ~19 million, 4 million above the official estimates as Chinese from all over the country come here for work because it has become one of the growth Chinese cities.

In my day job I run a team of people prototyping inventions, primarily electronics based devices. I had heard Shenzhen was the centre of the universe when it comes to electronics and making just about anything.

I was in Hong Kong for a short break and I decided to take a few day trips to across the border to see for myself. You can easily do it in a day and I will shortly publish details in another post to show you how but for now think of it as a 45 minute suburban train trip from Hong Kong with a low stress border crossing. If you look at it on a map, its like travelling from San Francisco to the Valley.

SEG Plaza Markets Shenzhen

The highlight of any day trip is the SEG Plaza Markets, they are absolutely amazing. If you work in Electronics, are a hobbyist or have ever dreamt of building your own electronic hardware you have to visit.

SEG Plaza

SEG Plaza

It is simply mind-blowing, the SEG centre is one of the largest markets, has 10 floors of electronics, with the bottom most levels given over to every imaginable component you would need to build any electronic device. All the surrounding buildings have similar arrangements, I lost count of how many of market buildings there are in the zone however it would be upwards of 15 surrounding the SEG Plaza.

Across the 10 floors there are literally thousands of little booths containing every chip, IC, memory, screw, bolt, nut, LED, reels of components ready for Surface Mounting (SMD), strips of LEDS in reels stacked 6ft high.

IMG_1121

Adhoc soldering on counters is the order of the day, workers are soldering components together, mounting chips or LED onto boards etc with Children running around as the day gets later. Occupational Health and Safety is not really a known concept.

As you get higher up the floors (there is a maze of escalators, with no apparent logic to it) the floors start to progress from components and accessories to fully assembled computers and notebooks, many are touting that they are from major brand names like Samsung, Acer (they probably aren’t) Lenovo (they might be) and then hundreds of motherboard resellers which may or may not be as described.

There is an amazing buzz to the place, literally it doesn’t stop, every moment there are dozens of people running from trader to trader, or wheeling trolleys stack with reels of components.

But unlike markets you will find in tourist ares the markets are really not for Westerners to buy a few gadgets, although they are welcome but they are not really looking for tourists.

The markets exist to trade components between suppliers and factories in the surrounding districts. Thousands of these little booths represent factories in the province, and other factories buy and ship whatever they need to each other.

Most of the traders are friendly

Most of the traders are friendly

Aside from just about every component, nuts, bolts, LEDs, lights, switches, SMT Rework stations, SMD ovens, CNC Routers just about anything you need to build an electronic project can be had within a few city blocks. The amazing thing is that they are just taking orders and shipping product all day, non stop people wheeling trolleys stacked high with reels of electronic components whizz past every few seconds.

CNC Routers

CNC Routers

A few words of warning

I don’t want to be alarmist or negative on doing business here because I think from my short visit the place is amazing and we will be establishing a presence sooner than later, but it was clear to me after a few days in the markets you could easily get taken for a ride.

Its not clear to me the sort of consumer and legal protections you expect in the Western world are available here to a Western visitor.

Whilst there are many honest suppliers it pays to beware. Many are selling used components, many sell substandard or even mislabeled products. No one is particularly worried about your needs, they may not give you the time of day to get the right thing for you or may not understand you, understandably most don’t speak English, Spanish, German or whatever you speak. Its very much caveat emptor.

Some might be genuine brands, and may actually work. Others less so. In their defence the Chinese Authorities are apparently trying to stamp out blatant counterfeit products according to some of the senior business people I spoke to.

Some of the companies do a great range of knockoffs including this very well engineered Jambox knockoff, interestingly there are many vendors of very cheap iPhones and Samsung phones, story is that they work and they have real smart phone components inside them but they are not at all the genuine article.

IMG_1018

I think the secret is that if you are looking at phones that cost less than costs for Apple or Samsung to make them then its a pretty good bet that they are not genuine.

The companies who make these knockoffs are known as Shanzhai which comes from the old stories of bandits who live in the mountains and evade the authorities, their products used to be mostly poor quality, however many of them are now making much higher quality products and starting to produce products which match the big guys for quality and innovation and some of the first double SIMM phones came from these companies. Some of these companies are turning into major brand names for the domestic Chinese market.

Successful Manufacturing in Shenzhen

It would seem that if you want to build product, you need to build solid relationships with local businesses, in my opinion the best way to start these relationships is to find yourself a fixer or sourcer of components who for a fee can introduce you to suppliers and manage the process when you are not in country.

To quote one of our guides,

“Product comes first it must be the right thing, then relationship, then price. Relationship is much more important to us than price”

To be successful manufacturing here I think one of your team has to be here regularly, many Kickstarter projects appear to have come off the rails for this reason, they completely underestimate the complexities and costs of managing the manufacturing process offshore.

Some of the expat old hands in the area talk about quality fade, where what you specified and ordered is gradually (or suddenly) substituted with lower quality or cheaper components and you might not get the good news until its in your customers hands.

Perhaps the only way to guard against this is to find someone who is trusted and recommended by a western manufacturer you know and trust and to have someone on hand inspecting the factories on a regular basis.

I think you also need to take some risks, check out some of the suppliers but not bet the farm on them until you build a longer term relationship.

If it is important that you know the exact components you are getting and where they came from for quality control reasons or certification requirements ie Medical Devices or other such, there is every chance this is not the right way for you to obtain components or develop new products.

Shenzhen is FAST

The upside is when you have someone here managing the more intense aspects of the development cycle such as rapid prototyping or getting the assembly and manufacturing process right you can rapidly accelerate your product development. As an example you can build prototypes at 2-5 times faster in Shenzhen than you can if you are sitting in Sydney or San Francisco (SF might be a little easier).

The convenience of being able to walk down the street and pick up the parts you need cannot be underestimated especially compared to being in a western city where you could face 1-2 weeks delay to get components in from overseas and $70 in express airfreight fees.

In Sydney if I want to order a new board, it can take 3-5 weeks to be fabricated, assembled, tested and then delivered.

In Shenzhen PCBs can be ordered and delivered within 2 days, assembly can be turned around in a few days, and if you have your engineer there you can have them work through the process with the assembly guys rather than 10,000 km away waiting two weeks for it turn up not knowing if it will work.

Its difficult to imagine building products in China and not having a member of your team here monthly if not during the whole process, certainly if you manage to get any level of success with your product you will need to establish a presence here.

Getting to the SEG Plaza Markets

Getting to Shenzhen from Hong Kong is fairly easy, but you need to do your homework before you go as once you are in the China its much more difficult to get access to Google Maps and many of the online Google tools you might be used to. If you are coming from Hong Kong take the metro from Luohu to Huaqiang Rd, its very cheap and very fast. I will post a separate article on getting there and through immigration later this week.

At the time I wrote this, 5 day Shenzhen Special Economic Zone Visas are available to most nationalities who wish to visit the city but the fees vary depending on your country (basically China just treats your citizens the way they your country treats their citizens). Note there are some nationalities that cannot get in via the 5 Day visa, in particular the USA. You should confirm your eligibility before you hope on the train at Hong Kong.

IMG_1041

Helpful Resources

There is a very active expat hardware community making cool stuff.

The guys from Dangerous Prototypes run these great Hacker Camps where for a very reasonable fee will take a group through the details of getting established and building product in Shenzhen, factory tours, where to eat, live, the markets and all the things that on your own you probably would struggle with for months or years.

They have another camp 3rd week in Sept 2014.

They kindly videoed the last one
Other resources

MetalTree’s HUGE 3D Printer demos at Sydney Maker Faire

Meet the Metaltree 3D Printer maker Jason Crowe.

Metaltree-Jason Crowe

Metaltree-Jason Crowe

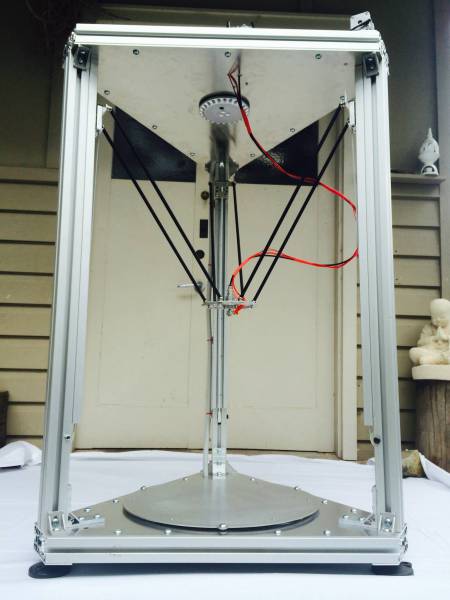
At 1.2m high this is the biggest 3D printer I have seen (and none of it is support cabinet), earlier in the year we researched over 50 printers in our 3d printers comparison and this is significantly larger build volume than anything I have seen on the market short of the industrial versions.

It uses a Delta configuration which means that the extruder head moves around on 6 arms and the build plate doesn’t move at all.

This simplifies construction and allows for a larger build space for a given size and weight than a traditional 3d Printer where the extruders move X Y but the build plate moves up and down as the item is printed.

Metaltree Extruder Head

Metaltree Extruder Head

This is still a prototype so its not ready for production yet, Jason is working towards getting it production ready and plans to launch a crowdfunding campaign to sell them next year.


Navdy – Head up Display for your car

Who?

Navdy

What is it?

Navdy’s transparent Head-Up Display (HUD) projects information as if it’s floating six feet in front of you. In the car you already have. Using your smart phone.

Navdy2

Swipe left to answer a call, or right to dismiss an untimely notification. No more looking down to fumble with knobs, buttons or touch screens. Ask Navdy to “compose new tweet”, “write new text” or “call mom” using the voice commands you’re already familiar with – Google Voice or Siri.

Any notification on your phone (text, social, etc) can be displayed, read aloud or disabled entirely. Decide what you want to appear when. There are even parental controls to keep teenagers safe.

They are taking pre-orders at $299, probably a pretty good chance of them being delivered given the team that is working on it and their background through the Highway 1 incubator.

Navdy-Preorder

Navdy is based in the Mission District of San Francisco and was founded by entrepreneur Doug Simpson and serial inventor Karl Guttag, and is supported by a highly accomplished veteran team.

In 2013 Navdy went through the acclaimed Highway 1 Incubator program and continues to work closely with Highway 1’s parent, PCH International, whose world class supply chain and manufacturing capabilities are used by companies such as Apple, Beats, and Google.

Navdy-Prototyping


The Defender – Smart Personal Defence, Identification & Response – Cool #Startups


The Pitch

Defender-App

Startup Name Pangaea Services, Inc
What problem are you solving? We are solving a self-defense and security problem by combining identification, alert, and defense in one device.
What is your solution? The Defender is a smart personal protection device that combines a camera, flash, siren, and pepper spray. The Defender connects to an iOS or Android device and with one push of a button, we capture the photo of an attacker, spray them with pepper spray, attract attention with the small but mighty siren and flash, all while our 24/7 monitoring service is notified with the picture and your GPS location so safety help can be dispatched to your exact location.
Why is this a great opportunity? This is a great opportunity because college students face safety threats on campus, violent crimes occur ever 22 seconds in this country, and we go everywhere with our phones. These features have never before been combined into one device.
Target Market We are targeting 100 million women that carry smart phones every day, including college students!We have over 1000 email signups for our pre-order and we will be launching our crowdfunding campaign on July 22nd.
How will you make money? We plan to give away the hardware and we will make money through the $15/month monitoring service.
Founders Names Ryan McManus, Steven Allen
Website http://www.getthedefender.com
What type of funding has the company received Bootstrapped/self funded


Startup88 Verdict

I think its a great idea, I think its a real problem and a good solution to the problem.

I like the services revenue model, although I think it is probably a little pricy per month for your average student it will find a home in the wealthier campuses and neighbourhoods.

Using a piece of hardware to lock in annuity revenue is a great business model, assuming its useful and customers believe its really is protecting them, is probably pretty immune to customer churn due to the uniqueness of the hardware.

The Bill of Materials and build cost on something like this would probably run $40-60 depending on how much work is being offloaded to the Mobile App so payback would be in the vicinity of 6 months, assuming they can convince the user to sign on for a longer term agreement, they will have a nice annuity revenue stream.

I do have some concerns, perhaps there is no solution for some of them, perhaps their solution is better than no solution.

  • Its a concern that they are relying on the mobile phone app to do the transmitting, what happens if the battery is flat, probably would be better if the Defender had its own GPS and data chip in it, I understand this would be an additional cost but more failsafe
  • What happens if this doesn’t work, hate to think the additional risk the woman would be in if the pepper spray didn’t stop them
  • I would be concerned that the local police and ambulance might not be too keen about having a 3rd party involved.
  • What happens if they don’t respond?
  • There may be some jurisdictions where the pepper spray is illegal
  • Running a 24×7 Operations Centre is hard, everyone in emergency lines around the world has trouble keeping service levels and you must when you are providing this sort of service, so I think there is some operational risk there.
  • Would have been nice to see some prototype devices that prove its ready to build, it isnt clear how far along they are in the build process.

The Defender is launching a Crowdfunding campaign shortly, however no details were available at time of publication.


Want to learn something? Make something cool – UNSW CREATE club prototypes a Quadcopter from scratch

Create-logoUniversity of NSW has a cool student group called CREATE, in their own time they teach each other how to design, fabricate and build hardware and have their own Hackerspace on the University campus.

I spend a lot of time around the Universities and they are one of the most entrepreneurial and creative groups I have met. They run weekly courses on Solidworks, Arduino, electronics, soldering, design, PCB prototyping and have access to workshops and 3d printing and other equipment to make their creations. They also setup market stalls in the University every week to sell electronics parts to help fund their activities and make it cheaper for the participants to get involved. If you are looking for startup team members I would suggest spending some time around these guys and girls, they get up and make things happen.

In 2013 they designed, built and sold a quadcopter from scratch, here is their story.

Creating a Quadcopter from Scratch

Quadcopter Chassis-Create UNSW

Quadcopter Chassis-Create UNSW

Throughout the semester, CREATE has been working on a DIY 3D printable Quadcopter, designed totally in house. What began with just a simple centrepiece, used to hold two cheap cuts of 12mm aluminium tube from Bunnings, has quickly developed into a totally enclosed, stable, quadcopter build.

The original design was based off parts we inherited on loan, which proved to be a good way to get in the air, yet for the quad to be successful, we needed to choose and buy parts specific to our needs.

Component list:

Main Chassis

The current quadcopter model still has the original 12mm diameter aluminium tube, though the centre chassis and motor mounts have evolved through a number of design revisions. The current chassis features 4 separate arms, each 250mm in length, and a hole in the centre which allows all the motor cables to fit through the centre.

Underneath the hole, there is a slot to hold the 4 in 1 esc, a mobile phone for telemetry and video, and a set of rails allowing us to slide on a custom battery clip, or anything else we need to carry. An ideal build would feature 12mm carbon fibre tube, as it has superior strength, weight and vibration dampening characteristics.

One of the original Prototypes - Credit - Sam Cassisi

One of the original Prototypes – Credit – Sam Cassisi

Flight Board Dampening System

Quadcopter FlightBoard

Quadcopter FlightBoard

A key feature of the new design is its flightboard vibration dampening system. The system is based on an elastic band, which holds the flight board down, and a set of foam pads, which dampen. The result of this is very little vibrations being passed to the flight board, providing a stable flight.

Protective Hood + GoPro Mount

In the pursuit of neatness and integration, we added a hinged hood which both covers all the electronics, and provides a high mounting point for the GPS receiver. Furthermore, the hood is extends vertically above the height of the propellers, so in the event of the quad flipping and landing upside down, the re-printable plastic will take the brunt of the damage.

The front of the chassis features a GoPro mount designed into the printed plastic, allowing secure camera mounting.

Quadcopter-Hood

Quadcopter Hood


Quad Cover Render - Credit Thingiverse.com

Quad Cover Render – Credit Thingiverse.com

Landing Gear

The landing gear is designed to transfer the landing force into the arms of the quad, taking stress away from the plastic. Furthermore, the whole setup is extremely light, using only 2 tiny cable ties to lock the landing gear onto the arms. A flange on either side of the landing gear meshes around the chassis and prevents the landing gear rotating unfavourably. The modular design allows us to make the legs longer if larger payloads are required, and to weld/reprint pieces as they break, rather than the quad.

Quadcopter-Landing Gear

Quadcopter-Landing Gear


Landing Gear - Renders

Landing Gear – Renders

Landing Gear Renders - Credit Thingiverse.com

Landing Gear Renders – Credit Thingiverse.com

Motor Mounts

The motor mounts have matured significantly since the first revision, as the current mounts are strong enough to resist minor crashes, but will break in the event of a serious accident, saving more expensive components like motors. A single nut and bolt secure the motor mount on the end of the aluminium arms.

The mounts feature a hidden cavity designed to hold a LED diode perfectly, the idea being to light up the front motor mounts with green LEDs, and the rear with red LEDs. There is also a slot to allow the motor wires coming from the ESCs to be fed through.

Quadcopter-Motor

Quadcopter Motor


Motor Mount Renders

Motor Mount Renders – Credit thingiverse.com

Want to build one?

The CREATE group have kindly uploaded all the files and designs to a Thingiverse page available here http://www.thingiverse.com/thing:172068 and licensed it under Creative Commons – Attribution – Share Alike License.


Technical Details:

Multiwii pro 2.0 flight board, running Megapirate 3.0.1 R2, a exact port of Arducopter

U-Blox Neo-6M GPS receiver, 10Hz

Turnigy 9x 8ch transmitter and receiver, running custom er9x firmware

Custom 4 in 1 120A ESC (4x30A)

AX-2810q 750KV motors, running at 3S (~12V), max current draw of ~26Amps

11×4.7 carbon plastic composite propellers

Approx. 1.5kg thrust per rotor at full throttle

3DR 915Mhz telemetry radios for 1.6km radius connection to PC software (Mission Planner)

Bluetooth for smartphone compatibility.

2x2200mAh Turnigy 3S 20-30C lithium polymer batteries, parallel.

Photos from the CREATE Quadcopter for the end of year social

Photos from the CREATE Quadcopter for the end of year social


Enhanced by Zemanta

3D Printer Comparison Guide – 50+ Printers featured inc Resolution, Print Volume, Costs & Materials

Recently I had to do some research on 3D Printers for work to try to get one that would print in a number of different materials but could not find a comprehensive list of 3D printers.

So I asked our team to spend a few weeks researching to find and compare every 3D printer they could find. Here is our comprehensive guide to all the 3D printers available in early 2014.

If you are launching a new 3D printer or if we missed your Printer our apologies please Tweet me @mikenicholls88 or tell us your story here and we will add it to the list, if it looks interesting we will also publish a separate article on it.

Also if there are any materials to be added, errors to be corrected or prices have changed please let us know and we will update immediately.

Unless otherwise specified all costs are in $USD

B9 Creator

Resolution: (X,Y) Plane: 50 microns, Z Axis: 6.35 microns

Materials to Print: UV-Cured Resin

Cost: $3375

Print Volume: 4″×3″×8-1/8″

Website: http://www.b9creator.com

Twitter Handle: https://twitter.com/B9Creations

Link to Reviews: makezine.com/review/guide-to-3d-printing-2014/b9-creator/

http://revolutionofmaking.blogspot.in/2012/10/review-top-5-low-cost-3d-printer-of-2012.html

Cube 2

Resolution: 200 microns

Materials to Print: No Print materials PLA, ABS

Cost: $1299

Print Volume: 5-1/2″×5-1/2″×5-1/2″

Website: http://www.cubify.com

Twitter Handle: https://twitter.com/cubify

Link to Reviews: http://makezine.com/review/guide-to-3d-printing-2014/cube-2/

http://3dprintx.net/mbot-cube-ii-3d-printer-review/

http://tobuya3dprinter.com/mbot-cube-2-3d-printer-review/

Felix 2.0

3d Printer Felix 2.0

Felix 2.0
shop.felixprinters.com

Resolution: Z axis: 0.05-0.35 mm

Materials to Print: PLA, ABS, nylon

Cost: $1949

Print Volume: 10″×8″×9-1/4″

Website: http://shop.felixprinters.com/

Twitter Handle: https://twitter.com/FELIXprinters

Link to Reviews: http://makezine.com/review/guide-to-3d-printing-2014/felix-2-0/

http://www.3dprintronics.com/blog/61-felix-3d-printer-review

Formlabs Form 1

3d Printer Formlabs Form 1

Formlabs Form 1
www.formlabs.com/

Resolution: Minimum layer thickness (Z axis): 25 microns

Materials to Print: UV-cured resin

Cost: $3299

Print Volume: 4.9″×4.9″×6.5″

Website: http://www.formlabs.com

Twitter Handle: https://twitter.com/formlabs

Link to Reviews: http://makezine.com/review/guide-to-3d-printing-2014/formlabs-form-1/

http://www.wired.com/reviews/2013/09/formlabs-form-1/

http://www.popularmechanics.com/technology/gadgets/reviews/3d-printer-prizefight-makerbot-replicator-2-vs-formlabs-form-1-14731437

http://www.3dengr.com/2013/03/Form1.html

Lulzbot Taz

Lulzbot TAZ 3D Printer

Lulzbot TAZ
www.lulzbot.com

Resolution: Z axis: 75 microns

Materials to Print: ABS, PLA, PVA, HIPS, and Laywood

Cost: $2195

Print Volume: 11.7″×10.8″×9.8″

Website: http://www.lulzbot.com

Twitter Handle: https://twitter.com/lulzbot3D

Link to Reviews: http://makezine.com/review/guide-to-3d-printing-2014/lulzbot-taz/

http://www.gizmag.com/review-lulzbot-taz-3d-printer/29284/

http://3dprintingindustry.com/2013/05/17/taz-lulzbots-newest-3d-printer-is-all-grown-up/

http://www.3dprinter.net/3d-printer-review-lulzbot-taz

Solidoodle 3

Resolution: Z axis: 0.1 mm

Materials to Print: ABS, PLA

Cost: $799

Print Volume: 8″×8″×8″

Website: http://www.solidoodle.com/

Twitter Handle: https://twitter.com/Solidoodle3D

Link to Reviews: http://makezine.com/review/guide-to-3d-printing-2014/more-printers-at-a-glance/

http://www.engadget.com/2012/12/15/solidoodle-3-hands-on/

Mendel Max 2.0

Mendelmax 2.0 3D Printer

Mendelmax 2.0
www.mendelmax.com

Resolution: X &Y Axis: 0.125 mm, Z axis: 0.1-0.4 mm

Materials to Print: ABS, PLA

Cost: $2195

Print Volume: 7.75″ × 12.25″ × 8.75″

Website: http://www.mendelmax.com

Twitter Handle:

Link to Reviews: http://makezine.com/review/guide-to-3d-printing-2014/more-printers-at-a-glance/

http://3dprintingindustry.com/2013/01/08/new-mendelmax-2-0-3d-printer/

MBot Cube 2

MBot Cube 2 3D Printer

MBot Cube 2
www.mbot3d.com

Resolution: Z axis: 0.1mm

Materials to Print: ABS, PLA

Cost: $1399

Print Volume: 10.25″ × 9″ × 7.75″

Website: http://www.mbot3d.com

Twitter Handle: https://twitter.com/mbot3d

Link to Reviews: http://makezine.com/review/guide-to-3d-printing-2014/more-printers-at-a-glance/

http://3dprintingindustry.com/2013/04/18/mbot-cube-3d-printer-just-a-little-bit-naughty/

http://tobuya3dprinter.com/mbot-cube-2-3d-printer-review/

http://3dprinting.teya.ca/2013/02/meet-the-mbot-cube/

Leapfrog Creatr

Leapfron Creatr 3D Printer

Leapfrog Creatr
www.lpfrg.com

Resolution: Z axis: 125 micron

Materials to Print: ABS, PLA and PVA

Cost: $2500

Print Volume: 9″ × 10.5″ × 7.8″

Website: http://lpfrg.com

Twitter Handle: https://twitter.com/Leapfrog_3D

Link to Reviews: http://makezine.com/review/guide-to-3d-printing-2014/more-printers-at-a-glance

http://www.prsnlz.me/blogs/daniel-oconnors-blog/leapfrog-creatr-review-3d-printer-review/

Openbeam Mini Kossel

Openbeam Mini Kossel 3d Printer

Openbeam Mini Kossel
www.makezine.com

Resolution: 100 steps per mm in all three directions

Materials to Print: PLA

Cost: $899

Print Volume: 7″×5.9″ dia

Website: http://www.openbeamusa.com

Twitter Handle: https://twitter.com/openbeam

Link to Reviews: http://makezine.com/review/guide-to-3d-printing-2014/openbeam-mini-kossel

Printrbot Plus

Printrbot Plus 3D Printer

Printrbot Plus
www.makezine.com

Resolution: Z axis: 0.1 mm

Materials to Print: ABS and PLA

Cost: $999

Print Volume: 8″×8″×8″

Website: http://printrbot.com/

Twitter Handle: https://twitter.com/printrbot

Link to Reviews: http://makezine.com/review/guide-to-3d-printing-2014/printrbot-plus

http://3d-printers.toptenreviews.com/printrbot-plus-review.html

http://www.reddit.com/r/printrbot/

http://www.protoparadigm.com/blog/2012/08/printrbot-plus-build-with-timelapse-and-notes/

Printrbot Simple

Printrbot Simple 3D Printer

Printrbot Simple
www.printrbot.com

Resolution: Z axis: 0.1mm

Materials to Print: PLA

Cost: $399

Print Volume: 3.9″×3.9″×3.9″

Website: http://makezine.com/review/guide-to-3d-printing-2014/printrbot-simple

Twitter Handle: https://twitter.com/printrbot

Link to Reviews: http://makezine.com/review/guide-to-3d-printing-2014/printrbot-simple

http://3dprintingindustry.com/2013/10/08/3d-hacker-gives-printrbot-simple-thumbs/

http://arstechnica.com/gadgets/2013/08/home-3d-printers-take-us-on-a-maddening-journey-into-another-dimension/

http://johnbiehler.com/2013/06/11/printrbot-simple-the-300-3d-printer/

Makerbot Replicator 2

Replicator 2 3D Printer

Replicator 2
www.makerbot.com

Resolution: Z axis:100 microns

Materials to Print: PLA

Cost: $2199

Print Volume: 11.2″×6″×6.1″

Website: http://makerbot.com

Twitter Handle: https://twitter.com/makerbot

Link to Reviews: http://makezine.com/review/guide-to-3d-printing-2014/replicator-2

http://3dprintingindustry.com/2013/05/16/the-replicator-2-an-honest-overview-of-the-machine-and-the-experience/

http://3d-printers.toptenreviews.com/replicator-2-review.html

4U Builder

Resolution: Z axis: 0.1mm

Materials to Print: PLA

Cost: $1688

Print Volume: 8.6″×8.25″×6.9″

Website: http://3dprinter4u.nl/en/

Twitter Handle: https://twitter.com/3dprinter4u

Link to Reviews: http://makezine.com/review/guide-to-3d-printing-2014/review-3dprinter-4u-builder

Airwolf AW3D XL

AW3D XL Printer 3D Printer

AW3D XL Printer
www.airwolf3d.com

Resolution: Z axis: 80 Micron

Materials to Print: ABS, PLA, HIPS, nylon, PVA, Laywood, and more

Cost: $2399

Print Volume: 12″×7.9″×7″

Website: http://airwolf3d.com/

Twitter Handle: https://twitter.com/AIRWOLF3D

Link to Reviews: http://makezine.com/review/guide-to-3d-printing-2014/review-airwolf-aw3d-xl

http://3d-printers.toptenreviews.com/aw3d-xl-review.html

http://www.engineering.com/3DPrinting/3DPrintingArticles/ArticleID/5558/AirWolf-AW3D-XL-3D-Printer.aspx

http://www.23dprinter.com/2013/09/airwolf-3d-printer-aw3d-xl-multiple-materials-machine-review.html

http://www.3dprinterprices.net/printers/airwolf-3d-printer-aw3d/

Bukito

Resolution: 50 microns (X,Y), 100 microns Z axis

Materials to Print: PLA, nylon, Laywood

Cost: $799

Print Volume: 5″×6″×5″

Website: http://deezmaker.com/

Twitter Handle: https://twitter.com/deezmaker

Link to Reviews: http://makezine.com/review/guide-to-3d-printing-2014/review-bukito

http://www.tomsguide.com/us/bukito-3d-printer-maker-faire,news-17592.html

http://3dprintingindustry.com/2013/05/29/deezmakers-new-bukito-portable-3d-printer/

Bukobot 8V2

Bukobot 8V2 3D Printer

Bukobot 8V2
www.makezine.com

Resolution: Z axis: 50 Microns

Materials to Print: ABS, PLA, nylon, polycarbonate, PVA, HIPS, Laywood, Laybrick

Cost: $1549

Print Volume: 8″×8″×8″

Website: http://deezmaker.com/

Twitter Handle: https://twitter.com/deezmaker

Link to Reviews:http://makezine.com/review/guide-to-3d-printing-2014/review-bukobot-8v2/

Tinkerine Studios Ditto+

Resolution: Z axis:100 micron

Material to Print: PLA

Cost: $1549

Print Volume: 8-1/4″×7-1/4″×9″

Website: http://tinkerines.com/

Twitter Handle: https://twitter.com/tinkerines

Link to Reviews: http://makezine.com/review/guide-to-3d-printing-2014/review-tinkerine-studios-ditto/

http://mobilemakerspace.com/makerspace-product-review-ditto-3d-printer/

http://solidsmack.com/cad-design-news/the-ditto-3d-printer-diy-hd-fff-3dp/

http://solidsmack.com/cad-design-news/the-ditto-3d-printer-diy-hd-fff-3dp/

http://3d-printers.toptenreviews.com/ditto–review.html

Type A Machines Series 1

Type A Machine Series 1 3D Printer

Type A Machine Series 1
www.typeamachines.com

Resolution: Z axis: 50 microns

Material to Print: PLA, nylon, soft PLA, PET

Cost: $2295

Print Volume: 12″×12″×12″

Website: typeamachines.com

Twitter Handle: https://twitter.com/typeamachines

Link to Reviews: http://makezine.com/review/guide-to-3d-printing-2014/type-a-machines-series-1/

http://www.23dprinter.com/2013/11/affordable-solid-type-a-machines-series-1-3d-printer.html

http://www.pcmag.com/article2/0,2817,2424909,00.asp

http://www.3ders.org/articles/20120821-introducing-four-new-personal-3d-printers.html

Ultimaker 2

Resolution: Z axis: 20 microns

Material to Print: PLA or ABS

Cost: $2565

Print Volume: 8.9″×8.9″×8.1″

Website: http://ultimaker.com/

Twitter Handle: https://twitter.com/ultimaker

Link to Reviews: http://makezine.com/review/guide-to-3d-printing-2014/ultimaker-2/

http://www.gizmag.com/ultimaker-2-3d-printer-speed-accuracy/29268/

UP Mini

Resolution: Z axis: 250 microns

Material to Print: ABS, PLA

Cost: $899

Print Volume: 4.7″×4.7″×4.7″

Website: http://pp3dp.com/

Twitter Handle: https://twitter.com/#%21/PP3DP

Link to Reviews: http://makezine.com/review/guide-to-3d-printing-2014/up-mini/

http://3dprintingsystems.com/products/up-mini-3d-printer/

UP Plus 2

UP Plus 2 3D Printer

UP Plus 2
www.pp3dp.com

Resolution: Z axis: 150 micron

Material to Print: ABS, PLA

Cost: $1649

Print Volume: 5-1/2″×5-1/2″×5-1/4″

Website: http://pp3dp.com/

Twitter Handle: https://twitter.com/#%21/PP3DP

Link to Reviews: http://makezine.com/review/guide-to-3d-printing-2014/up-plus-2/

http://3dprintingsystems.com/products/3d-printers/up-plus-2-3d-printer/

Cubify CubeX

Resolution: Z axis: 100 microns

Material to Print: PLA / ABS / Dissovable Natural PLA

Cost: $2499

Print Volume: 10.8” x 10.45” x 9.5”

Website: http://cubify.com/

Twitter Handle: https://twitter.com/cubify

Link to Reviews: http://3d-printers.toptenreviews.com/cubex-review.html

http://www.engadget.com/2013/01/08/eyes-on-with-3d-systems-cubex-and-next-generation-cube/

Cubify Cube

Resolution: Z axis: 200 microns

Material to Print: PLA plastic and ABS plastic or Tough Recyclable or Compostable Plastic

Cost: $1299

Print Volume: 5.5 x 5.5 x 5.5 inches

Website: http://cubify.com/

Twitter Handle: https://twitter.com/cubify

Link to Reviews: http://3d-printers.toptenreviews.com/cube-review.html

http://www.pcmag.com/article2/0,2817,2418103,00.asp

http://reviews.cnet.com/3d-printers/3d-systems-cube/4505-33809_7-35473913-2.html

http://www.pocket-lint.com/review/123480-cubify-cube-3d-printer-second-gen-review

Lulzbot AO-101

Lulzbot AO 101 3D Printer

Lulzbot AO 101
www.lulzbot.com

Resolution: Z axis: 200 microns

Material to Print: ABS and PLA plastic filaments

Cost: $1725

Print Volume: 200mm x 190mm x 100mm

Website: http://www.lulzbot.com/

Twitter Handle: https://twitter.com/LULZBOT

Link to Reviews: http://3d-printers.toptenreviews.com/lulzbot-ao-101-review.html

http://www.lulzbot.com/?q=news/reviews

http://3dprintingindustry.com/2013/03/01/3d-printer-review-lulzbot-ao-101/

Afinia H

Resolution: Z axis: 150 microns

Material to Print: ABS

Cost: $1599

Print Volume: 200mm x 190mm x 100mm

Website: http://www.afinia.com/

Twitter Handle: https://twitter.com/Afinia3DPrint

Link to Reviews: http://3d-printers.toptenreviews.com/afinia-h-review.html

http://techcrunch.com/2013/11/04/hands-on-with-the-afinia-h-series-3d-printer-a-rugged-printing-rig-for-home-and-school/

AW3D V5

AW3D V5

AW3D V5

Resolution: Z axis: 0.1mm

Material to Print: PLA, ABS and a wood-based PLA filament

Cost: $1695

Print Volume: 200 x200 x112 mm

Website: http://airwolf3d.com

Twitter Handle:

Link to Reviews:http://3d-printers.toptenreviews.com/aw3d-v5-review.html

3D Touch

Resolution: Z axis: 125 microns

Material to Print: ABS, PLA

Cost: $3400-$4200

Print Volume: 275 x 275 x 210mm

Website: http://www.cubify.com/

Twitter Handle: https://twitter.com/cubify

Link to Reviews: http://3d-printers.toptenreviews.com/3dtouch-review.html

http://3dprinters.ws/

http://www.theregister.co.uk/2013/02/04/ten_3d_printers/

http://www.3dprintingera.com/review-of-3d-touch-3d-printer/

Printrbot Jr

Printrbot Jr

Printrbot Jr

Resolution: Z axis: 0.1mm

Material to Print: ABS and PLA

Cost: $699

Print Volume: 5.9inch x 5.9inch x 5.9inch

Website: http://www.printrbot.com/

Twitter Handle: https://twitter.com/printrbot

Link to Reviews: http://3d-printers.toptenreviews.com/printrbot-jr-review.html

http://32b.it/?p=86

http://3dprintx.net/printrbot-jr-review/

http://3dprintingindustry.com/2013/08/19/printrbots-junior-3d-printer-is-all-grown-up-other-things/

Cannonball Allstar

Canonball Allsta

Canonball Allsta
www.3dstuffmaker.com

Resolution: Z axis: 0.05mm

Material to Print: PLA

Cost: $1950

Print Volume: 4.7 x 4.7 x 4.7 inches

Website: http://www.3dstuffmaker.com----escape_sem_autolink_uri:5b0ae5dc5a3a51ebcc3e396774304d72----

Twitter Handle: https://twitter.com/3dstuffmakers

Link to Reviews: http://3d-printers.toptenreviews.com/allstar-review.html

http://www.deskeng.com/articles/aabffp.htm

http://www.testseek.com/computers/printers/3d-printers/thre3d_cannonball_allstar-p-9311ea32-d91e-2e54-7a3b-9b9fb56b5182.html

Fablicator

Resolution: Z axis: 0.1-0.3 mm

Material to Print: PLA, ABS

Cost: $3495

Print Volume: 7 x 7 x 7 inches

Website: http://www.fablicator.com----escape_sem_autolink_uri:5b0ae5dc5a3a51ebcc3e396774304d72----

Twitter Handle: https://twitter.com/fablicator

Link to Reviews: http://3d-printers.toptenreviews.com/fablicator-review.html

Evolution

Resolution: Z axis: 0.2-0.4mm

Material to Print: PLA

Cost: $1295

Print Volume: 8 x 8 x 8 inches

Website: http://www.3dstuffmaker.com/evolution-3d-printer/

Twitter Handle: https://twitter.com/3dstuffmakers

Link to Reviews: http://3d-printers.toptenreviews.com/evolution-review.html

Mega Prusa

Resolution: Z axis: 0.35 mm

Material to Print: PLA

Cost: $1495

Print Volume: 11 x 10 x 8 inches

Website: http://www.3dstuffmaker.com/buy-mega-prusa/

Twitter Handle: https://twitter.com/3dstuffmakers

Link to Reviews: http://3d-printers.toptenreviews.com/prusa-review.html

Hyrel 3D Engine E3

Resolution: Z axis: 0.2mm

Material to Print: ABS and PLA

Cost: $2495

Print Volume: 8 x 8 x 8 inches

Website: http://www.hyrel3d.com/

Twitter Handle: https://twitter.com/HyRel3D

Link to Reviews: http://3d-printers.toptenreviews.com/hyrel-3d-engine-review.html

http://3dprintingindustry.com/2013/09/24/toms-guide-best-3d-printers-2013/


Solidoodle 4

Solidoodle 4 3D Printer

Solidoodle 4
www.solidoodle.com

Resolution: Z axis: 0.1-0.4 mm

Material to Print: ABS

Cost: $999

Print Volume: 8 x 8 x 8 inches

Website: http://www.solidoodle.com

Twitter Handle: https://twitter.com/Solidoodle3D

Link to Reviews: http://3d-printers.toptenreviews.com/solidoodle-review.html

http://www.engadget.com/2013/11/22/solidoodle-4/

DaVinci (Kinpo)

Resolution: Z axis: 0.2-0.4mm

Material to Print: PLA

Cost: $1295

Print Volume: 8 x 8 x 8 inches

Website: http://www.3dstuffmaker.com/evolution-3d-printer/

Twitter Handle: https://twitter.com/3dstuffmakers

Link to Reviews: http://3d-printers.toptenreviews.com/evolution-review.html

Makibox A6 LT

Resolution: Z axis: 0.04mm

Material to Print: PLA

Cost: $200

Print Volume: 150mm x 110mm x 90mm

Website: http://www.makibox.com

Twitter Handle:

Link to Reviews: http://www.licensetoquill.co.uk/2013/05/09/the-best-home-3d-printers-2013/

http://www.fabberforge.com/fabnews/2012/12/29/makibox-a-complete-3d-printer-for-200.html


Makibox A6 HT

Makibox A6 HT 3D Printer

Makibox A6 HT
www.makibox.com

Resolution: 100 microns

Material to Print: ABS, PLA

Cost: $300

Print Volume: 150mm x 110mm x 90mm

Website: http://www.makibox.com

Twitter Handle:

Link to Reviews: http://www.licensetoquill.co.uk/2013/05/09/the-best-home-3d-printers-2013/

http://3dprintingindustry.com/2012/12/18/makibox-a6-affordable-reliable-and-simple-3d-printer-project/

The Buccaneer (Pirate 3D)

Resolution: 85 microns

Material to Print: PLA

Cost: $347

Print Volume: 145mm x 125mm x 155mm

Website: https://pirate3d.com----escape_sem_autolink_uri:5b0ae5dc5a3a51ebcc3e396774304d72----

Twitter Handle: https://twitter.com/pirate3d

Link to Reviews:

3D P01 (Heacent)

Heacent 3D Printer

Heacent 3D Printer
www.heacent.com

Resolution: Z axis: 0.004mm, (X,Y): 0.012mm

Material to Print: PLA

Cost: $388

Print Volume: 200mm x 200mm x 100mm

Website: http://www.heacent.com

Twitter Handle:

Link to Reviews:

Sumpod MDF Delta

Sumpod MDF Delta

Sumpod MDF Delta
www.sumpod.com

Resolution: 0.02mm all axis

Material to Print:

Cost: £349.00

Print Volume: 180mmx180mmx200mm

Website: http://www.sumpod.com----escape_sem_autolink_uri:5b0ae5dc5a3a51ebcc3e396774304d72----

Twitter Handle: https://twitter.com/SUMPOD

Link to Reviews: http://solidsmack.com/software-hardware-reviews/the-sumpod-3d-printer-review/

Sumpod Aluminum V2

Sumpod Aluminum V2

Sumpod Aluminum V2
www.sumpod.com

Resolution: Z axis: 0.02mm

Material to Print:

Cost: £799.00

Print Volume: 220mmx220mmx150mm

Website: http://www.sumpod.com

Twitter Handle: https://twitter.com/sumpod

Link to Reviews: http://solidsmack.com/software-hardware-reviews/the-sumpod-3d-printer-review/

Sumpod Mega

Sumpod Mega

Sumpod Mega
www.sumpod.com

Resolution: Z axis: 0.02mm

Material to Print: PLA and ABS

Cost: £3,000

Print Volume: 600mm x 600mm x 600mm

Website: http://www.sumpod.com

Twitter Handle: https://twitter.com/sumpod

Link to Reviews: http://solidsmack.com/software-hardware-reviews/the-sumpod-3d-printer-review/

Leapfrog BV Xeed

Resolution: X,Y,Z axis: 12 microns

Material to Print: ABS, PLA, PVA

Cost: $7054

Print Volume: 600 mm x 800 mm x 500 mm

Website: http://www.lpfrg.com

Twitter Handle: https://twitter.com/Leapfrog_3D

Link to Reviews:http://3dprintingindustry.com/2012/10/03/leapfrog-a-step-closer-to-easy-to-use-3d-printing/

Robo 3D

Resolution: Z axis: 100 microns

Material to Print: ABS, PLA

Cost: $699

Print Volume: 254 mm x 203 mm x 254 mm

Website: http://www.robo3dprinter.com

Twitter Handle: https://twitter.com/robo3dprinter

Link to Reviews:http://exprinted.com/robo3d-printer-review/

http://3dprinters.ws/

http://www.licensetoquill.co.uk/2013/05/09/the-best-home-3d-printers-2013/

http://www.gadgetreview.com/2013/11/10-3d-printers-for-under-1000-that-anyone-can-use-at-home-today.html

Portabee Go

Resolution: Z axis: 100 microns

Material to Print: PLA

Cost: $395

Print Volume: 120 mm x 168 mm x 135 mm

Website: http://www.portabee3dprinter.com

Twitter Handle: https://twitter.com/portabee3d

Link to Reviews: http://3dprintingindustry.com/2013/11/22/portabee-go-portable-3d-printer-go/

http://forums.vr-zone.com/chit-chatting/2904838-review-portabee-3d-printer-the-most-afforable-singapore.html

Revolution 3D (QU-BD)

Revolution 3D

Revolution 3D
www.qu-bd.com

Resolution: Z axis: 100 microns

Material to Print: ABS

Cost: $999

Print Volume: 6” x 5.5” x 5.5″

Website: http://www.qu-bd.com

Twitter Handle:

Link to Reviews: http://www.gadgetreview.com/2013/11/10-3d-printers-for-under-1000-that-anyone-can-use-at-home-today.html

http://www.gizmag.com/qu-bd-one-up-3d-printer/29760/

http://machinesonthemind.blogspot.in/2013/09/qu-bd-revolution-xl-review-part-1.html

CB Printer

Resolution: Z axis: 0.1 mm

Material to Print: Acrylate Photopolymer Resin

Cost: $2146

Print Volume: 200mm x 200mm x 180 mm

Website: http://www.cb-printer.com

Twitter Handle:

Link to Reviews: http://3dprintingindustry.com/2012/10/23/cb-printer/

http://www.licensetoquill.co.uk/2013/05/09/the-best-home-3d-printers-2013/

Objet Connex 500

Objet Connex 500

Objet Connex 500
www.stratasys.com

Resolution: X-axis: 600 dpi; Y-axis: 600 dpi; Z-axis: 1600 dpi

Material to Print: ABS and other materials.

Cost: $250,000 (estimated)

Print Volume: 500mm x 400mm x 200mm

Website: http://www.stratasys.com

Twitter Handle: https://twitter.com/Stratasys

Link to Reviews: http://www.licensetoquill.co.uk/2013/05/09/the-best-home-3d-printers-2013/

http://www.core77.com/blog/technology/tool_porn_the_connex500_20467.asp

http://solidsmack.com/fabrication/this-is-what-an-objet-connex500-printed-3d-printed-record-actually-sounds-like/

http://tech2.in.com/features/printers/tech2-checks-out-the-connex350-worlds-only-multimaterial-3d-printer/302612

http://www.engadget.com/2011/07/10/objet260-connex-makes-3d-printing-cheaper-feasible-for-cramped/

Pirx

Resolution: 100 microns

Material to Print: Acrylic

Cost: $799

Print Volume: 160mm x 250mm x 150mm

Website: http://pirx3d.com/

Twitter Handle: https://twitter.com/pirx3d

Link to Reviews: http://www.tested.com/forums/makerbot/459298-pirx3d-3d-printer-from-poland/


Five real problems I really think need solving

“Problems are only opportunities in work clothes.”

Henry J. Kaiser US Industrialist I was talking to a class of University students the other day and they were looking for problems to solve as part of their hardware design subject after a lot of thought this is what I came up with. I believe they are validated and represent real business opportunities.

Prototyping and small volume Manufacturing Machines

English: SMT placement machine Juki KE-2080L a...
English: SMT placement machine Juki KE-2080L at Megger’s Dover site. (Photo credit: Wikipedia)

Hardware is hard and expensive to develop. There are a bunch of reasons around this and it’s usually nothing to do with the cost of the components which are mostly very cheap. Its primarily to do with the lags and lead times involved in building new devices and building prototype circuits and devices and access to the equipment needed to build circuits most of which is located in manufacturing centres in Asian countries.

If you believe as I do that Western economies can start to move their smarter manufacturing back from low cost countries, then the logical extension of this is that we should have the ability to quickly and easily make prototypes and send these into small volume manufacturing locally rather than waste 3-4 weeks trying to get someone overseas to prototype it for you (and then have to do it numerous times until you have a workable product)

Also the cost of putting a consumer electronics product into production is in the millions due to setup costs.

Rapid Prototype and small run manufacturing machines could provide solutions to allow local makers and hardware hackers to experiment and build at low volume to prove out a market before they invest $1000000s in funding a full production run.

I am 75% of the way through a rapid prototype for a wearable device at work and one of the things I can say with some conviction is that the faster you can find errors in your designs and correct and test them the cheaper and faster the overall production will be.

But to find errors you usually have to build, if you have to build you usually have to send it overseas, none of this is easy and can take weeks to months, what if you could build it in your office or garage in an afternoon on a Rapid Prototype Machine.

This would further cut the costs and difficulties of developing hardware. I know you can make your own single and double layer boards, there are lots of tutorials on the web but its tough to do anything complex on the kitchen table and it is very difficult to get any sort of complexity using etch resist using Toner/Iron/Sandwich maker.

Typically once you are past the breadboard you have to start thinking about Surface Mount components and these are very small and difficult to work with and require special soldering equipment or ovens.

Brisbane based Cartesian Co has created this fantastic Kickstarter Project the EX1 which provides rapid 3d Printing of Circuit Boards using conductive silver nano paint sprayed on like an inkjet.

EX1-3d Circuit Board Printer - Kickstarter

EX1-3d Circuit Board Printer – Kickstarter

The Kickstarter project finishes today and has smashed its target and is a great example of the need for these type of machines http://www.kickstarter.com/projects/cartesianco/the-ex1-rapid-3d-printing-of-circuit-boards?ref=country#

For most of last century a manufacturer and mechanical workshop needed the following

  • Drill press,
  • Lathe,
  • Milling machine,
  • Welder
  • Bandsaw,
  • A massive production line with lots of workers

In this era we need

  • PCB Fabrication Machine
  • Pick and Place Machine
  • SMD surface mount soldering machine/oven
  • 3D printer (with numerous materials)
  • CNC Router/mill
  • Small Production line full of robots
  • Office full of designers and programmers

Domestic Power Consumption Measurement

solar monitor thingy

solar monitor thingy (Photo credit: djbones)

I recently received a $1500 power bill for the quarter. It seems like a lot, its a big house and has some big water pumps but surely not that much.

One or more of the appliances are consuming a lot of energy it would seem but which one?

So here is the problem I cant tell how much power I use in real time, I can’t tell what devices are using the power.

Neither can anyone else.

No single product seems to be able to tell me where the power is being consumed and how to optimise it.

If you are looking for a huge problem this is definitely huge, every home owner in the Western world is going to continue to be hit with rising power bills far in excess of inflation and are looking for easy ways to reduce this.

Solar Power Storage Systems

English: Solar Power demonstration house A dem...

English: Solar Power demonstration house A demonstration of various forms of solar power technology at the CAT 27588. (Photo credit: Wikipedia)

I want to convert to solar, but apparently its not very economically feasible, the payback is 5 years plus. In our house and I suspect most houses except retirees, consumption is greatest in the evenings and early mornings and lowest in the day times, which is the exact opposite of solar generation.

And yet almost no one puts in batteries to store the charge generated during the day to power usage during the evening. Instead they pump their excess power (most of it) it back onto the grid where the power companies pay you peanuts for it and if predictions are true will end up charging you an electricity access fee if you start generating enough power to be self sufficient and don’t need them anymore.

So why hasn’t anyone worked out an energy storage system that balances the generation hours and consumption hours, such a system would make solar so much more effective without changing solar cell technology. I haven’t found anything except for extremely expensive batteries and not many are being implemented.

If you could harness all of the power every day and store it, the breakeven on Solar would drop dramatically and most users could probably use smaller systems and cover most of their needs. I can tell you that Governments and Power Companies will not like this and will try to cover infrastructure costs by charging for access to the grid even if you are not using power, however in my opinion if you can manage to supply most of your own power, water and if you can substitute solar power for petrol, you will be next decades rich lister.

Defense System against Spying Drones

MQ-1 Predator - Credit Wikipedia.com

MQ-1 Predator – Credit Wikipedia.com

Destroying or generally defending against drones from paparazzi or unwanted surveillance will become a must have if you are a celebrity or bizoid, someone will work out how to do this without hurting people and will make a business from products that take down or decoy drones. Some of this may or may not be legal depending on where you live.

Easy system for managing Personal Encryption across all your services

Personal encryption is not easy, its non trivial to get end to end encryption of email, VPN or other services or applications without an IT department.

It is impossible to easily ensure all of your personal data and communications are correctly secured. In the days of NSA mega surveillance or for those living in countries with malevolent Governments this may be a matter of life or death but its exceptionally difficult to get right. Someone who made it easy could charge a premium for this.


What do you think? What problems do you see that are validated problems still not solved? Please leave your comments below.


Enhanced by Zemanta